Plug-ins Editor
Use this tool to browse and update existing Vine plug-ins as well as configure and upload new plug-ins.
Overview
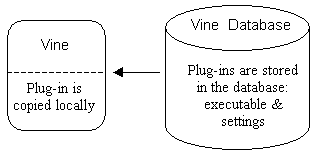
When you install a new plug-in, it is stored in the Server Database in the VY_PLUGIN table. At startup, Vine checks which plug-ins are assigned to its user group and copies the new or updated plug-ins to the client side.
Note: Please note that Vine needs to be synced and restarted for it to notice changes in the plug-in files.
Installing Plug-ins
To register a new plug-in, use the Plugins Editor in the Administrator’s Console:
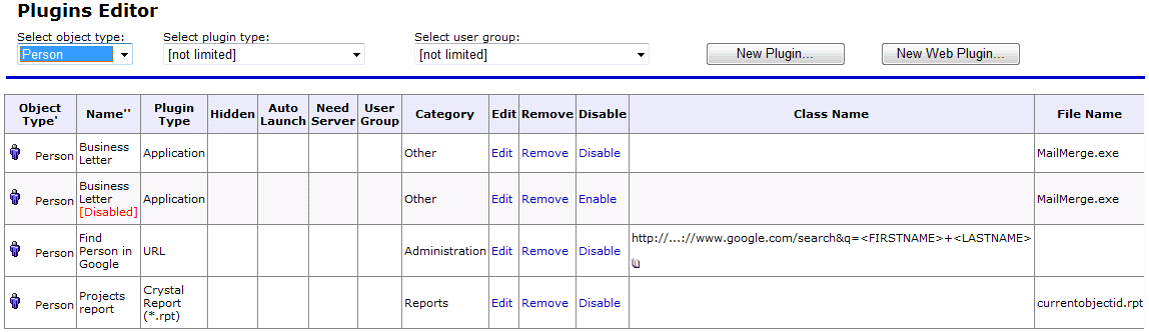
The Editor lists all plug-ins in the database which you can filter by object type, plug-in type or assigned user group. To edit or delete a plug-in click Edit or Remove, respectively.
To add a plug-in:
- Click New Plugin… The following form will appear:
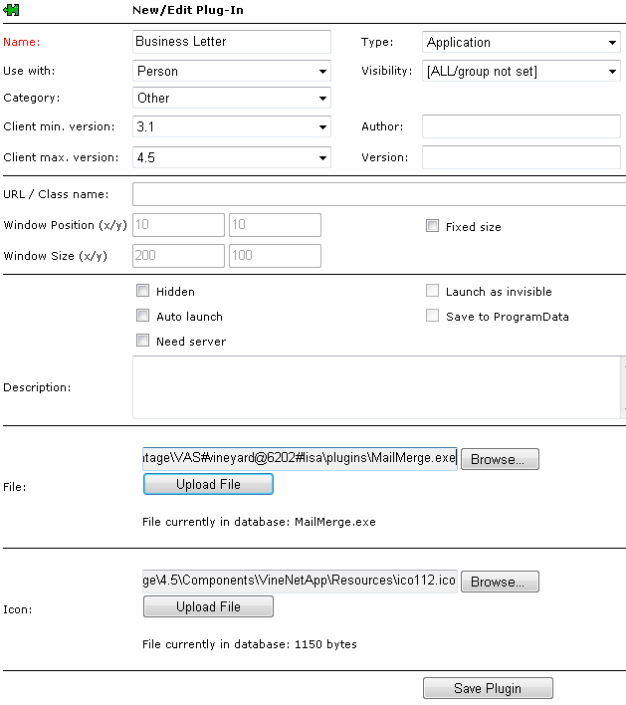
- Choose and enter the needed plug-in settings. For detailed description of the plug-in settings, see the "Plug-in Settings" section.
- Enter the name of the plug-in in the Name edit box. Enter the plug-in short description in the Description field.
- If the type of the plug-in is not a URL then browse and upload the plug-in file in the File section.
- If you want the plug-in to have its own icon on the Tools tab and/or in the context menu, you can browse for the .ico file and upload it in the Icon section.
- Click Save Plugin.
Installing Web Plug-ins
To add a web plug-in:
- Click New Web Plugin… The following form will appear:
- Enter the name of the plug-in and other settings.
- Use the Browse button in the File area to upload all the files the web plug-in uses.
Note: You need first to browse for the file that will be the start page of the web plug-in. Then it will be used in the automatically generated URL. If you do not first browse for the start page file then you will need to manually edit the URL or create the web plug-in anew.
For example, in the sample above the "showAllEvents.jsp" file will be used as the plug-in's start page and the following URL will be automatically generated after you have clicked Save Plugin.
/Vine/pageloader.jsp?username=<USERNAME>&password=<PASSWORD>¤tobjectid=<CURRENTOBJECTID>&loadpage=/Vine/webplug-ins/500000850/showAllEvents.jsp
- If you want the plug-in to have its own icon on the Tools tab and/or in the context menu, you can browse for the .ico file and upload it in the Icon section.
Please refer to the Vine Developer's Guide for more information about web plug-ins.
Plug-in Settings
Associated Object Type
Using the Use with menu you should specify how the user will run the plug-in:
- Choose All if the plug-in is a general purpose tool and should be always available from the Vine Tool menu.
- Choose the needed object type if you want the plug-in to be available only when an object of this type is selected.
Note: For a support file, the Use with option should be set to All.
Plug-in Type
Choose the type of the plug-in from the Type menu. The following types are available:
- ActiveX. An ActiveX control.
- Application. A separate application that will be run from Vine.
- Crystal Report (*.rpt). This type is supported by Vine Web 4.1, Vintage 4.2 and their higher versions. A Crystal Report is an .rpt plug-in file created and designed in Seagate Crystal Reports.
- Vintage 4.0 Report (*.rpt/*.rep). This older type of reports is only supported in Vine Vintage up to the version 4.5. A Vintage 4 report consists of two files (*.rpt/*.rep) which must be added to the Vine database as plug-ins.
- Support File. For an additional file that is necessary to run some plug-in.
- URL. For a web site/page that will be opened in Vine.
- V4 Component. Vine Vintage 4 consists of many components installed by the Vintage installer. One way to update a component to a newer versions is to upload it to the Vine database as a plug-in of this type. Then, when started, Vintage will download and install it instead of the older one.
- V4 Tool Tab. A new tab can be added to the Tools tab in Vintage by registering the corresponding binary file as a plug-in of this type.
- .Net Control. A .NET control.
- .Net V4 Tool tab. Similar to V4 Tool Tab. Used for .NET controls created to work as a Vintage tool tab.
- Mail Wizard Template. Mail Wizard template file should be zipped with its pictures and other elements.
Category
Plug-in categories are used to group plug-ins on the Tools pane in Vine.
Visibility
From the Visibility list choose the user group that will use the plug-in. Choose All if the plug-in is of general use and all Vine users should be able to use it.
URL / Class Name
In this edit field you need to enter:
- For a URL - the Internet address (the URL itself).
- For an ActiveX/V4 Tool Tab/.Net V4 Tool Tab/.Net Control/.Net V4 Tool Tab - the class name. If the control is already registered then you can find the class name in the registry under the HKEY_CLASSES_ROOT branch. Otherwise, it should be provided by the developer or vendor.
Window Info
Note: Window Position/Window Size/Fixed size settings are not used in the 4.* versions of Vintage.
For a plug-in which is a separate application you need not enter window settings because the application can create its own windows, but for an ActiveX or URL you need to enter additional information in the Window Info section.
Window Position
You can define how a plug-in window appears on screen. The plug-in window can be given an exact location within the main Vintage window or can be set to cascade over the previous plug-in window.
Specify the location of the plug-in window in the Window position boxes. Enter the location of the upper left corner of the window in pixels along horizontal (X) and vertical (Y) axes.
Window Size
You can define the initial size of a plug-in window. Set the window size in the Window size boxes.
Select the Fixed size check box if you want to fix the size of the window. In this case the user will not be able to resize the window.
Other Settings
- Choose Vine client versions from the Client min and max version lists. A Vine client whose version is less than min or higher than max specified will not work with this plug-in.
- If necessary, enter the version number and author name in the Version and Author edit boxes, respectively.
- Select the Hidden check box if you want the plug-in to be invisible to end users. Usually support files should have the hidden attribute.
- Select the Auto launch check box if you want the plug-in to be started when Vine starts.
- Select the Need server check box if you want the plug-in to be used only with the server connection. Without the server connection the plug-in will not work.
- Select Launch as invisible if you want the control to start but its window to be not visible, for example, if the plug-in must wait for some event to happen.
- Select Save to ProgramData if you are using older VB plugins which expect its support files to be located in the same folder with them.