Post-installation Tasks
Your first tasks after creating the database are:
Please note that you should use Vine Web Administrator’s Console for the above and other day-to-day database administration tasks. To install and start this console:
Entering Vine Product Licenses
About Vine Licenses
To use Vine products you need a license for the server and separate licenses for all Vine products. Vine client applications obtain and verify licenses stored in the server database at the beginning of every session. They will not operate without valid licenses.
A Vine license consists of a Product ID, serial number, the number of users and the expiration date (if any). You can increase the number of users or convert an expired demo license to a production license by ordering a new license. The serial number will remain the same even when your license changes. If you need to upgrade a license for any Vine product, please contact Vine.
You can enter Vine licenses on the Licenses page of Vine Server Setup or using the License Editor in the Vine Web Administrator’s Console
Using Vine Server Setup
Start Vine Server Setup, login using either the system or vineyarddb account and then go to the licenses page by clicking Licenses in the left shortcut area or first selecting Configure Vine Database and then clicking Next.
The Licenses page lists all the Vine products which need separate license keys and shows the status of each license:
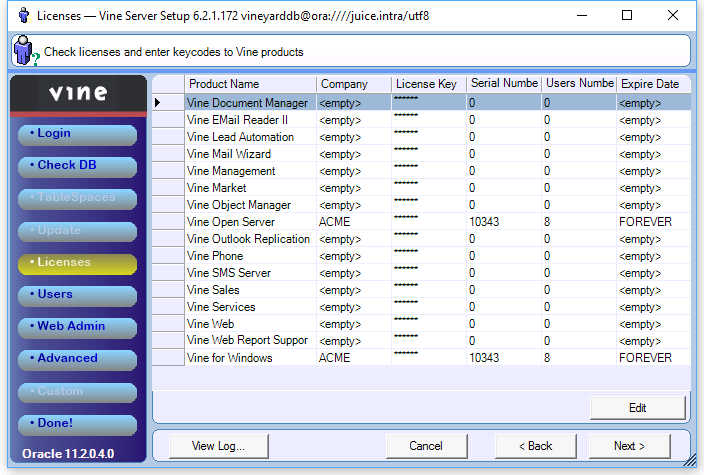
Click the license row you want to edit and click Edit. The Product License dialog will appear where you can enter your license key and the name of your company:
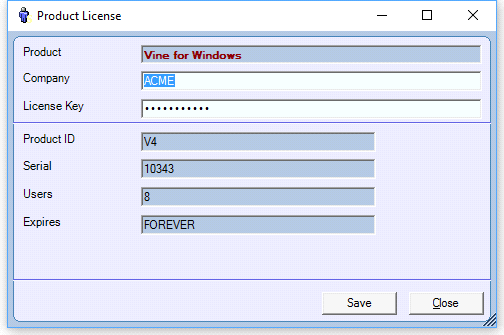
Click Save. If you entered a valid license key then it will be saved and its status will appear on the Licenses page.
Note: The license key, must be typed in exactly as received from Vine with all special symbols and cases preserved.
Using Vine Administrator’s Console
You can enter Vine licenses using License Editor.
Please refer to the License Editor section in the Vine Web Administrator’s Console chapter for detailed instructions.
Installing and Configuring Vine Administrator’s Console
Installing Vine Web and Administrator’s Console
Vine Administrator’s Console in included in Vine Web’s installer (vineyard.war file). Please refer to the Vine Web User’s Guide, chapter Installation and Administration for information needed to install Vine Web and included Administrator’s Console.
Configuring Console
Vine Administrator’s Console configuration should be done on the Web Admin page of the Vine Server Setup wizard:
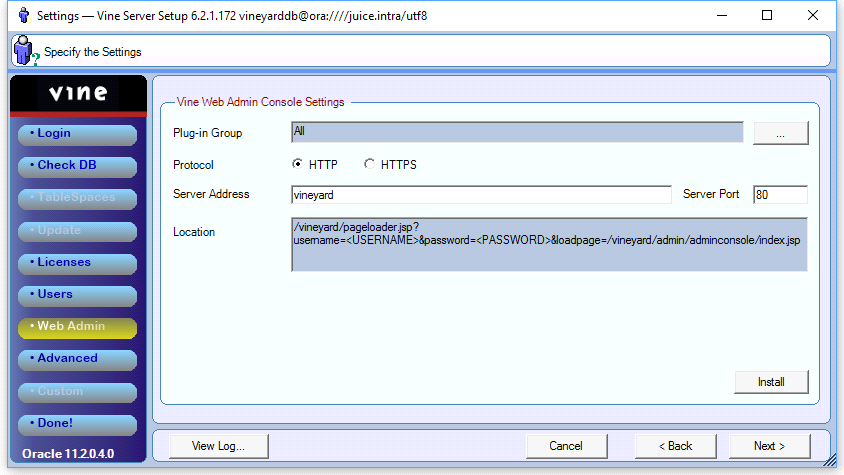
Choose the group whose users will see this command (using the Plug-in Group setting); the needed Protocol, the server name or IP address and the port number. Click Install.
Note: T he Server Address string and port number you provide must exactly match those you will use when connecting to Vine Web.
For example:
The Administrator’s Console will not work if you provide
“web.vineserver.com” as a DNS server name
and then connect to Vine Web using URL such as http://10.10.10.10/vineyard/
even though 10.10.10.10 is the IP of the “web.vineserver.com” host.
In this example, you need to connect to Vine Web using http://web.vineserver.com/vineyard/ for the Administrator’s Console (and other Web plug-ins) to work.
Correct URL
A correct, working URL must include three parameters: username, password and loadpage. For example:
Administrator’s Console Users
If you want to use the console from Vine Web you must be a member of the “Vine Web Users” and “Vine Web Administrators” groups.
If you want to use the console from Vine client for Windows you must be a member of the “Vine for Windows Users”, “Vine Web Users” (or “Vine Web Report Users”) and “Vine Web Administrators” group.
Please create a Vine user with appropriate rights for administering the database using the Users page of Vine Server Setup.