Designing a Label
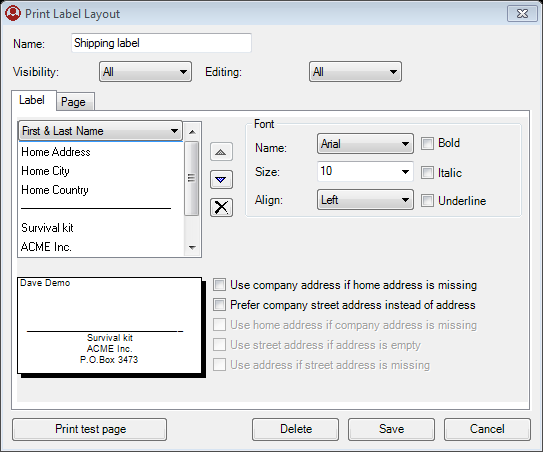
You design a mailing label using the Print Label Layout dialog.
The dialog consists of two tabs. The Label tab is intended for editing rows of a label and the Page tab serves to set some options for the whole label.
To change the label access settings: select appropriate user groups from the Visibility and Editing lists In lists objects are represented by small icons and object names. Icons help you to recognize object types. Press a keyboard character (a letter or a digit) to jump to the list item that starts from this character. The first matching item will be chosen, counting from the top of the list..
Use the Label tab to edit the rows of the label:
-
To add a row, select the bottom row that has an <Add row> string.
-
To move a row in the list: select the row and click
 to move the row up or
  to move the row down one position.
 -
To change data in a row: Select the row and choose a person or company object All information in Vine is stored in the server database as named objects of different types. Examples: a company, a person, an event, a sales case. field from the row list. If you want to add permanent text, you should select <static text> and enter any text that will be present on every printed label.
-
To change row text settings: Select the row and use the Font group of settings.
-
To delete a row, select it and click Delete label row.
When you choose the address fields from the Row list, check boxes will appear which permit you to specify exactly what address you want to be printed.
For the company address fields ("Company.Address" and "Company.Street Address"), the following check boxes will appear:
Use Home address if company address is missing. If the "Company.Address" and "Company.Street Address" fields are empty then the person's "Home Address" will be printed.
Use address instead of street address. This checkbox is taken into account only when both the company address fields ("Company.Address" and "Company.Street Address") are present. If either of them is empty then the other one is printed regardless of the status of this check box.
For the person "Home Address" field, the following check boxes will appear:
Use Company address if home address is missing. If the "Home Address" field is empty then a company address will be printed.
Use address instead of street address. For the "Home Address" field, this checkbox is always selected; you cannot change it. It is taken into account only if the "Home Address" field is empty and the previous check box is selected.
On the Page tab, you specify settings that apply to the whole page:

In the Margins group, you can:
-
Set the indents from the borders of the page.
-
Select a cell where you want the first label to be printed. Note that you will be always able to change it in the Print dialog just before actual printing.
In the Settings group, you can:
-
Specify how many columns (Cols) and rows (Rows) you want to be printed on a page and define spaces between the columns and rows.
-
Define how many copies of each label you want to be printed by entering the number of the copies in the Copy each label field.
-
Skip printing the bottom row on a page by selecting Skip last row. Use it if you have problems printing the bottom row of a sheet of labels.
-
Set the order in which labels will be printed by using the Sorting lists.
-
Test your settings by clicking Print test page. A test page will be printed using sample data.