Automations
A Vine Automation rule is a workflow diagram of actions that you want to be performed when a certain marketing action happens.
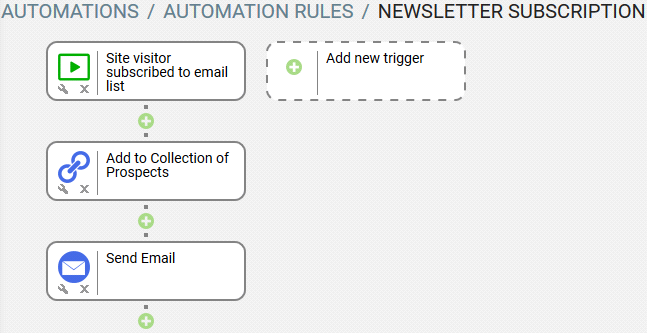
It can be a very simple workflow as in the following sample which automatically triggers when a site visitor subscribes to an email list and then adds the person to a collection of sales prospects and sends an email to the person who subscribed:
You can find samples of real useful automation rules here.
The Automations page allows you to analyze statistics of your running automations, build new ones, and test how they perform.
At the top of the page the following automation counters gives you an overview of the current usage of your automation rules:

- Executions - how many automation rules have been triggered in last 30 days. Click the counter to see more details:
- In progress - how many automation rules are currently running or waiting. Click the counter to see more details:
- Sent Emails - how many emails were sent by automation rules in last 30 days.
- Leads - how many leads have been created by automation rules in last 30 days. Click the counter to see more details:
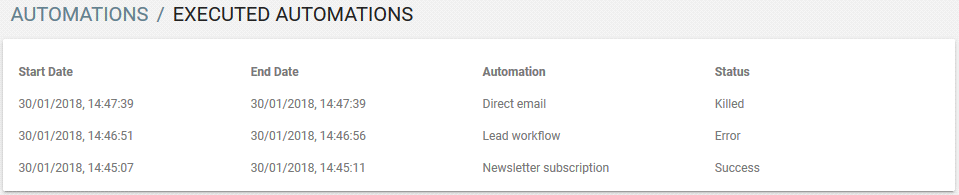
The following statuses are possible: Success, Error, Killed(if an automation was interrupted while in progress), and Skipped (which happens when an already running automation attempts to start again for the same object but its "Start even if it runs already for same object" checkbox is cleared).

Click
 , if you want to stop a running automation.

The Summary chart shows the following line graphs:
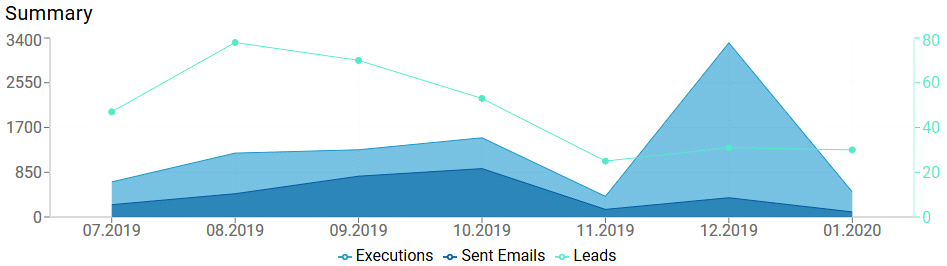
- Executions - how many automations activated each month.
- Sent Emails - how many emails were sent by automations each month.
- Leads - how many leads created each month.
The Top Automations table lists automations which have been triggered most often.
The Last Automations table lists automations which have been triggered recently. Click More to see more automations.
Automation Rules Page
After the charts, the Automations page lists all your automation rules:
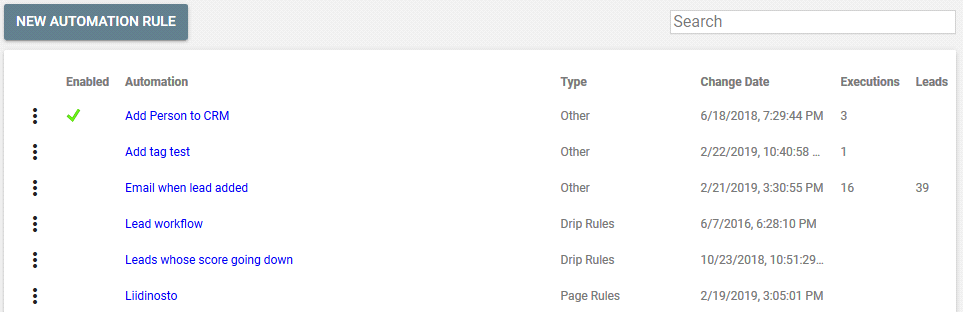
To edit a rule click it. To open more commands for a rule, click  on its left side:
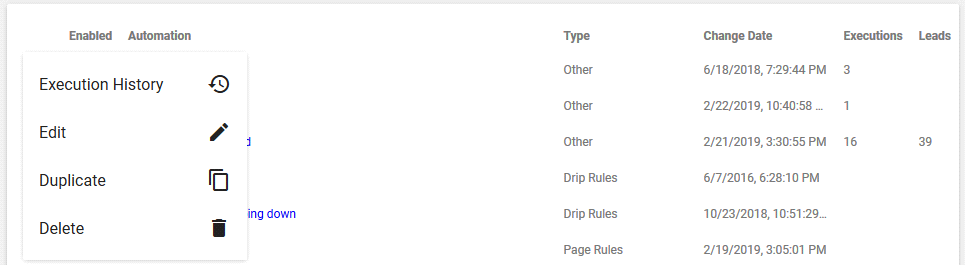
- To edit a rule, select

- To make a copy of a rule, select

- To delete a rule, select
- To see the execution history for a rule, select
 . (Please note that history is only kept for three months.)
The history page lists all currently running and already executed instances of the rule:
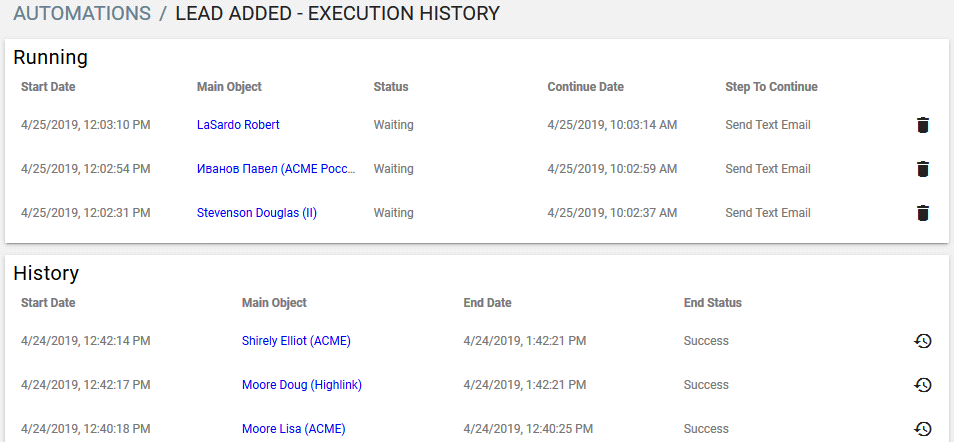
Click a person link to see the person's summary view.
Click , if you want to stop a running automation.
Click  at the end of a history row to see the full Automation log for that entry.
Creating an Automation Rule
- Click
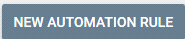 to create a new rule.
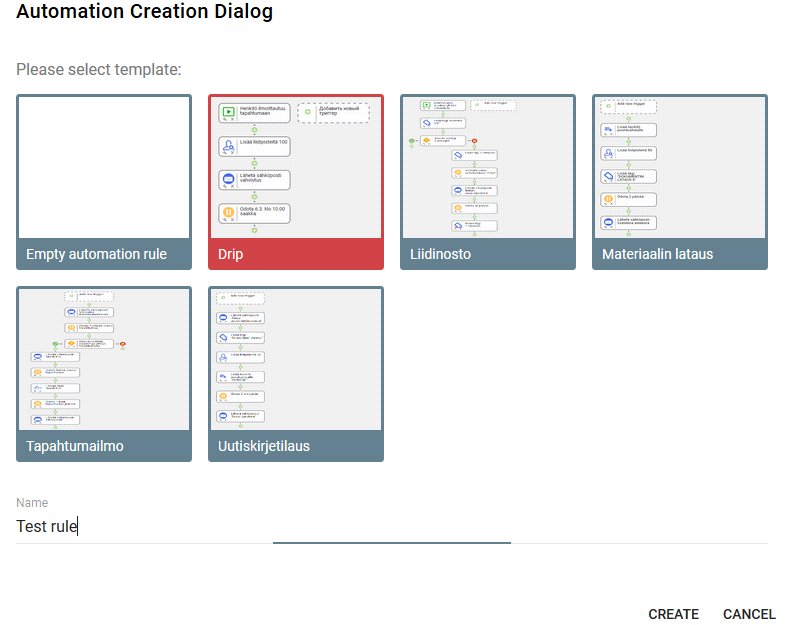
 - Select an automation template or select "Empty automation rule" if you want to start from scratch.
- Enter a name for the rule.
- Click Create.
- If you have chosen "Empty automation rules" then you will be first prompted to configure the rule settings before the rule will be created.
- If you have chosen an automation template then the rule will be created with default settings and you will see the diagram of the chosen rule:
-
The exclamation marks
 show which activities are invalid now and need additional data. Click each to open its activity and fix it.
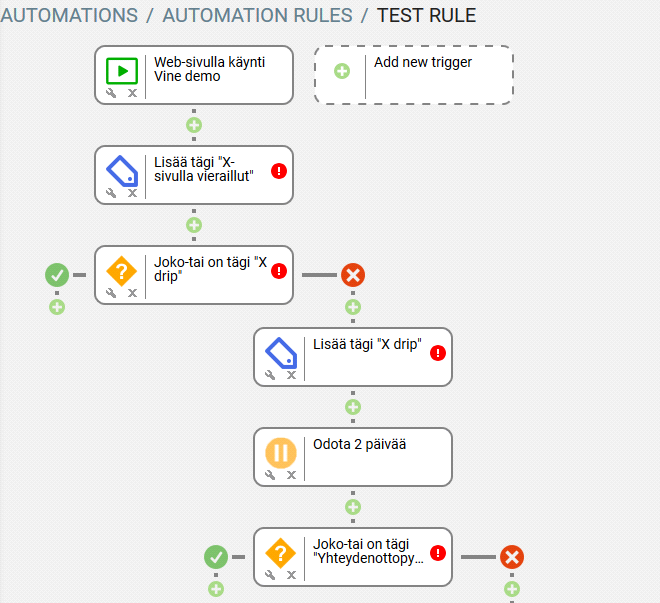
Adding Triggers
Click ![]() next to Add new trigger to create a trigger. Please refer to the Creating Triggers section for information about how to create triggers.
next to Add new trigger to create a trigger. Please refer to the Creating Triggers section for information about how to create triggers.
You can create as many triggers as needed. In case of multiple triggers,
the automation will start when any trigger activates.
Please note that it is possible to create a rule without a trigger. Then it can be activated directly by other means. (For example, from a web site form.)
Adding Activities
Click ![]() below a trigger or an activity to add an activity to your workflow. Please refer to the
Creating Activities section for information about how to work create activities.
below a trigger or an activity to add an activity to your workflow. Please refer to the
Creating Activities section for information about how to work create activities.
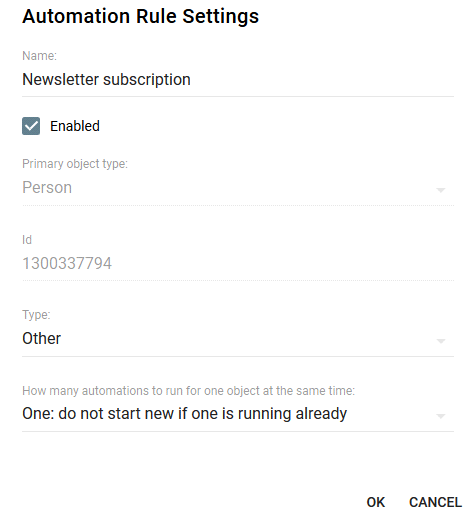
Configuring Rule Settings
- Click Settings to change rule settings.
- If needed change the name of the rule.
- Select Enabled if you want to activate the rule. Please note that you can not activate an empty rule with no actions. You need to first add at least one action.
-
Select the Primary object type for your rule. The primary object type is the object type that will be used in your triggers (will be triggering your rule). You can change it only if the rule does not yet have any triggers or actions.
- ID of a rule is its unique number and it might be needed, for example, when starting the rule from a custom web form. ID is automatically assigned to a rule when it is saved for the first time. You cannot change it.
- Select an automation type from the Type list. In Vine CRM, this will place the automation rule to the respective folder on the Automation Rules tool. The following automation types are available now:
- Form rules - used for rules assigned to web site forms. For example, register for newsletter, or webinar forms.
- Drip rules - used for Drip Marketing rules. For example, rules to send a series of emails to a lead.
- Page rules - used for web page visits. For example, a rule that starts when a person opens a page on your web site.
- Other - can be used for all other rules.
- Use the How many automations to run for one object at the same time setting to specify how many of this automation you want to allow to be executed simultaneously for the same object:
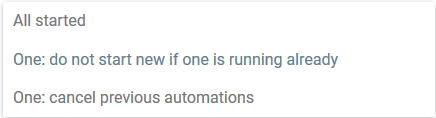
Usually you would want this to be One: do not start new if one is running already, for example, to prevent a lead raised for the same person again or to prevent drip emails to be started again when the person visits the same page. In some cases, however, you need the All started setting. For example, this setting is usually selected in an automation started by a web form as the form user expects the same actions to happen again when, for instance, a button is clicked several times. - Click OK when you have finished editing your rule.
You can use One:cancel previous automations, for example, when using forms where you want to reactivate an automation for a returning site visitor.
Testing Automations
You can test an automation if its primary object is person.
Click TEST for a person automation and verify if all actions perform correctly. (Some reasonable limitations apply: for example, the Wait action skipped in tests; all emails sent to the current user.) Please note that you need to first click SAVE to store all your automations changes before testing those.
Select Show included objects if you want to see Vine objects used in the rule.
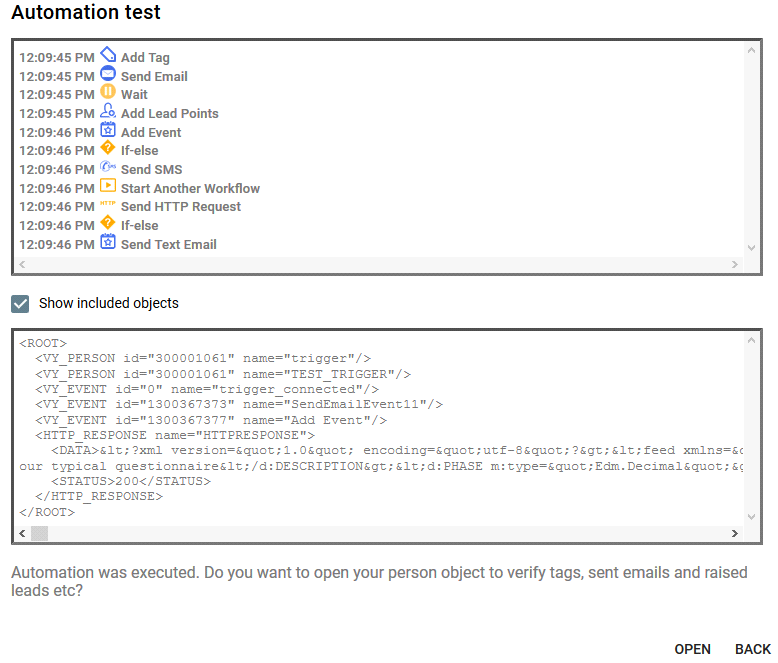
Please note that the name field here is used to identify an object in this automation only and should not to be confused with the name of an object in the database.
For example:
- For Include object to automation action you specify the automation name for an object
-
For Send Email action: "SendEmailEvent" text followed by the step number of the action in the whole automation is used as the automation name of a created event.
-
For Add Event action: the name of the action is used as the automation name of a created event.
-
For Raise Lead action: "Raise Lead" is used as the automation name of a created lead.
In addition, the following automation names are used for objects added in three first steps of a test run:
-
"Trigger" name used for an object triggering an automation. (For test runs, the current user of MA is normally used as a triggering person.)
<VY_PERSON id="412329929" name="trigger"/> -
An automation object with a name ""TEST_TRIGGER" is always created in test automations to identify those. It uses the same "trigger" object as in step one.
<VY_PERSON id="412329929" name="TEST_TRIGGER"/>- . -
"trigger_connected" is an event normally created in automation runs activated by a "Connection Added" or "Registered to Event" triggers. It is also created in test runs and connected to the triggering person, but this event is not saved in the database in a test run.
<VY_EVENT id="0" name="trigger_connected"/>
Creating Triggers
Select a trigger type from the Create Trigger dialog.
The dialog will list only triggers applicable for the selected primary triggering object.
- Connection Added – triggers when the specified connection is added to the selected or any object.
- Connection Removed – triggers when the specified connection is removed from the selected or any object.
- Tag Added – triggers when an object is added to the selected tag list.
- Tag Removed – triggers when an object is removed from the selected tag list.
- Lead Phase Changed To – triggers when a lead's phase changes to the specified one. This can happen, for example, in the Vine Sales application. After the trigger activates, both the lead and sales persons are available and can be used in automation actions.
- Lead points changed over X points in N days – triggers when a lead person acquires or loses X lead points within N days.
- Document Downloaded – triggers when a person downloaded a selected document.
- Form Submitted – triggers when a site visitor fills in and submits the selected form.
- Questionnaire Filled – triggers when someone fills in the selected questionnaire.
-
Object Added – triggers when an object of the given type is created in the database.
-
Field Value Changed Over – triggers when the value of the selected field of any object of the primary object type becomes bigger (or equal) than the given value.
-
Field Value Changed Under – triggers when the value of the selected field of any object of the primary object type becomes smaller (or equal) than the given value.
-
Parameter Value Changed To – triggers when the value of the selected parameter changes to the set value.
-
Registered to Event – triggers when someone registers for the selected event.
- Web Page Visited – triggers when an identified person visits the selected tracked web page.
- Email Link Clicked – triggers when an email recipient clicks a certain link in email.
-
Subscribed – triggers when someone subscribes for an email list on the Vine Customer Web. (It does not trigger when a person has been added to the subscription folder manually in the Vine database.)
-
Unsubscribed – triggers when someone unsubscribes from an email list on the Vine Customer Web.
Connection Added
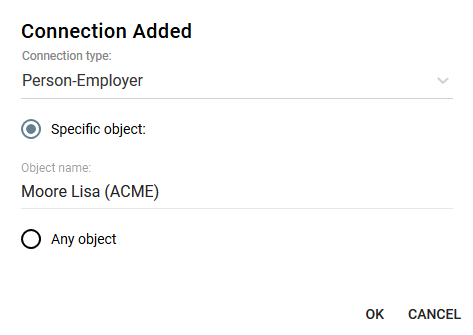
-
Select a connection type.
-
Select Specific object if you want the trigger to activate when a connection of the selected type is added to a specific object or select Any object if you want the trigger to activate when a connection of the selected type is added to any object.
- If you selected Specific object then enter the name of an existing object.
-
Click OK.
Connection Removed
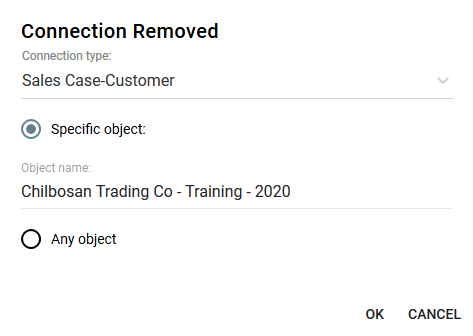
-
Select a connection type.
-
Select Specific object if you want the trigger to activate when a connection of the selected type is removed from a specific object or select Any object if you want the trigger to activate when a connection of the selected type is removed from any object.
- If you selected Specific object then enter the name of an existing object.
-
Click OK.
Tag Added
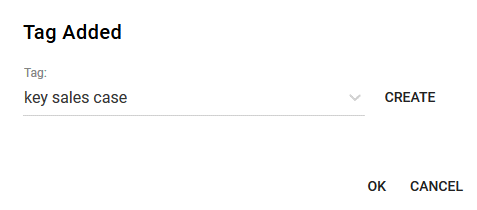
-
Select a tag from the Tag list or click Create to add one. Please note that tags of the primary object type are shown and if you create a tag then it will be of the primary object type as well.
The trigger will activate when an object is added to the selected tag list. -
Click OK.
Tag Removed
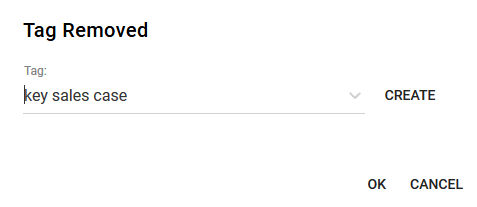
-
Select a tag from the Tag list or click Create to add one. Please note that tags of the primary object type are shown and if you create a tag then it will be of the primary object type as well.
The trigger will activate when an object is removed from the selected tag list. -
Click OK.
Lead Phase Changed To
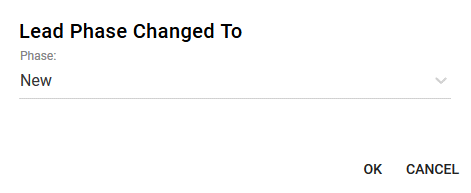
-
Select a phase which should activate the trigger when a lead's phase changes to it.
-
Click OK.
Lead points changed over X points in N days
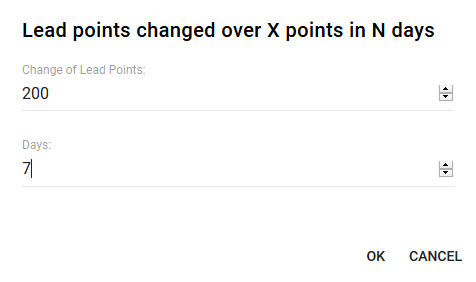
-
Enter a number of lead points which you want to activate the trigger. It can be an increase (a positive change) or a decrease (a negative change) in points.
-
Enter a span of days over which you want to track these changes.
-
Click OK.
Document Downloaded
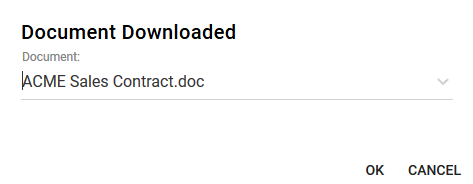
-
Select a document to trigger the rule.
-
Click OK.
Form Submitted
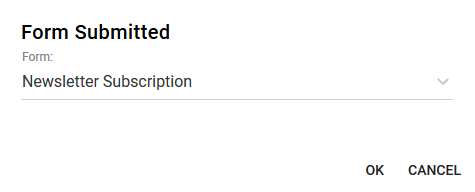
-
From the Form list, select a form which you want to activate the trigger. Now this trigger will be activated each time when a site visitor fills in and submits this form.
-
Click OK.
Questionnaire Filled
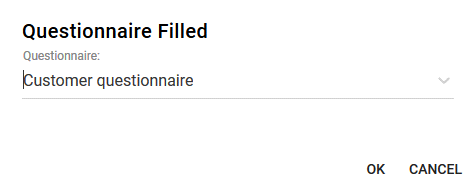
-
From the Questionnaire list, select a questionnaire which you want to activate the trigger. This trigger will be activated each time when someone fills in and submits this questionnaire.
-
Click OK.
Object Added
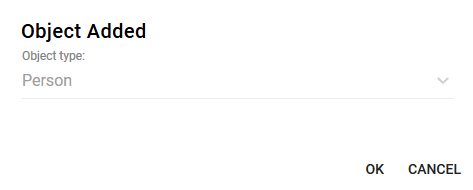
-
You cannot select the object type which is defined by the primary object type.
-
Click OK.
Field Value Changed Over
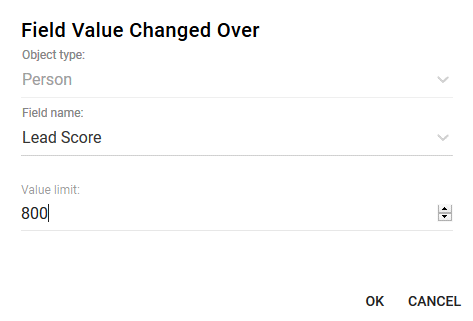
-
Object type is the primary object type. You cannot change it.
-
Select the field whose value you want to be checked.
-
Enter the value of the field. The trigger will be activated when the field’s value becomes bigger (or equal) than the given value.
-
Click OK.
Field Value Changed Under
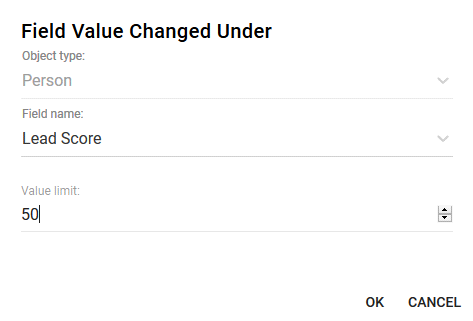
-
Object type is the primary object type. You cannot change it.
-
Select the field whose value you want to be checked.
-
Enter the value of the field. The trigger will be activated when the field’s value becomes smaller (or equal) than the given value.
-
Click OK.
Parameter Value Changed To
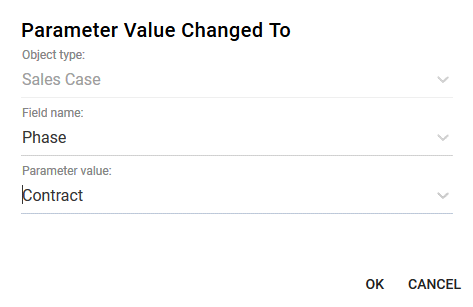
-
Object type is the primary object type. You cannot change it.
-
Select the parameter field whose value you want to be checked.
-
Enter the value of the parameter which you want to activate the trigger.
-
Click OK.
Registered to Event
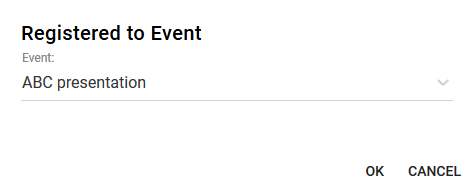
-
Select an event.
-
Click OK.
Web Page Visited
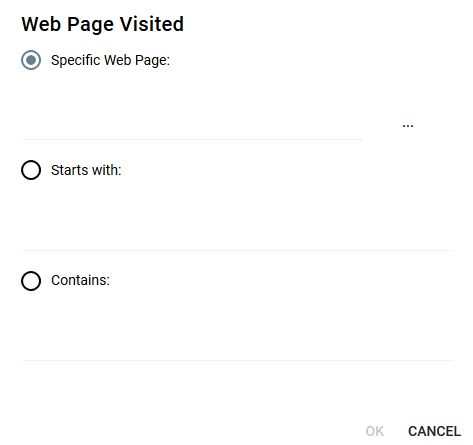
-
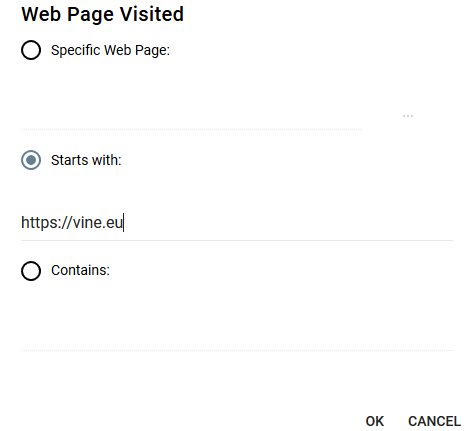
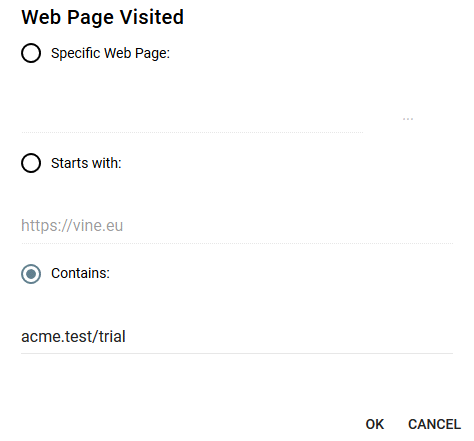
- Select Specific Web Page if you want the trigger to activate when a specific page is visited
- Select Starts with if you want the trigger to activate when any page with address starting with a given string visited.
- Select Contains if you want the trigger to activate when a page is visited whose web address(URL) contains the text string you enter.
- If you have selected Specific Web Page:
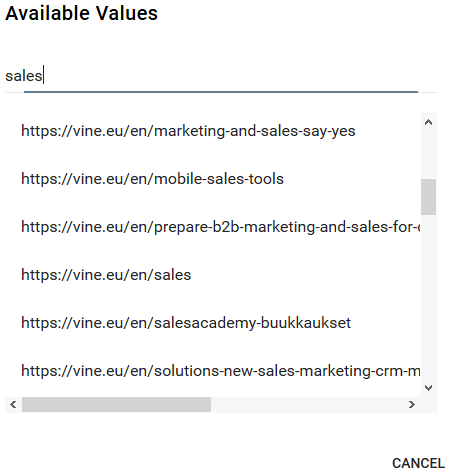
- Click the ellipsis button to open a list of available web pages.
- Use the search filter to limit the listed web pages if needed and select the one you want to activate the trigger.
- If you have selected Starts with:
- If you have selected Contains:
- Click OK.
Enter the main starting part of the web address so that a visit to any web page whose address starts from this main part will activate the trigger:
Enter a text string you want the URL of a triggering page of your site to include:
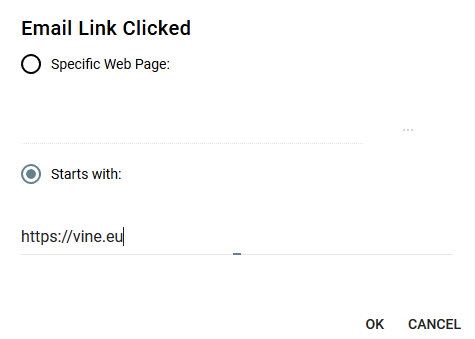
Email Link Clicked
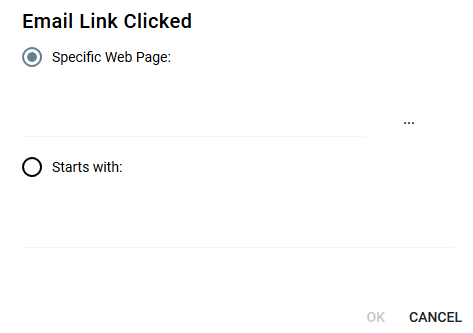
- Select Specific Web Page if you want the trigger to activate for a link to a specific page or select Starts with if you want the trigger to activate for any link starting with a given string.
- If you have selected Specific Web Page:
- Click the ellipsis button to open a list of available web links.
- Use the search filter to limit the listed web links and select the one you want to activate the trigger.
- If you have selected Starts with:
- Click OK.
Enter the starting part of the web link so that a click to any link whose address starts with this part will activate the trigger:
Subscribed
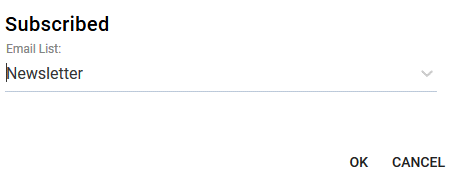
-
Select an email list.
-
Click OK.
Unsubscribed
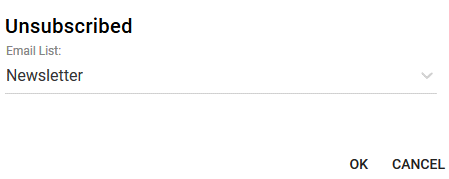
-
Select an email list.
-
Click OK.
Creating Activities
Select activity type from the Create Activity dialog:
The dialog will list only activities applicable for the current set of objects included in the automation.
-
Add Connection – adds a connection of the selected type to the selected object.
-
Delete Connection – removes a connection of the selected type to the selected object.
- Add Tag – adds a tag. You can tag Vine objects to group them by certain criteria. A tagged object is automatically added to a folder with the same name. For example, you can tag a person based on what web page the person has visited or what event registered for.
- Delete Tag– deletes a specified tag.
-
Add Event – creates a preconfigured event and connects responsible people to it.
-
Add Lead Points – adds a specified amount of lead points to the triggering person.
-
Add Person to Email List– adds the triggering person to an email list.
-
Include object to automation – adds a new object to automation. For example, you can include a contact person for a sales case and then send that person an email or an SMS. After an object is added to an automation, it appears in the Do this action to field in all relevant next activities.
- Raise Lead – raises a lead.
- Send Email – sends a preconfigured email to the person set in the Do this action to field.
- Send Internal Email – sends a text email to a list of internal email addresses.
- Send Text Email – sends a text email to the person set in the Do this action to field.
-
Send HTTP Request – allows running an HTTP request to any web service. Using HTTP requests you can interact with, for example, Vine REST or any external web service.
-
Send SMS – sends an SMS message to the lead and responsible people.
-
Set Values – sets a value of an object's field.
-
Start Another Workflow – gives the possibility to start another workflow from previously created ones.
-
Wait – interrupt the workflow of activities and wait for a specified time before continuing with the next activity.
- If-else – splits the workflow logic into YES and NO branches depending on the result of a condition.
- Merge Branches – this action allows to merge the YES and NO branches of an IF/ELSE action into a single automation thread.
Add Connection action
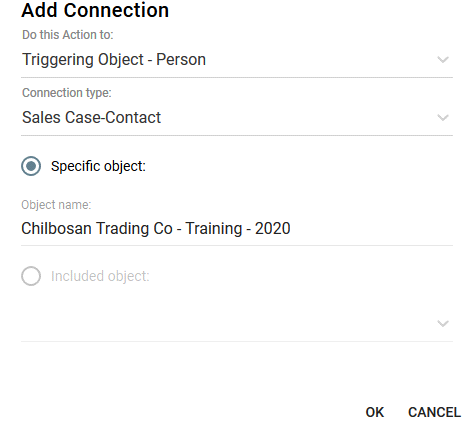
- Select the target object of the action from the Do this action to list.
- Select a connection type and an object to be connected.
- You can either select a specific object which database name you know when saving the action or select an object that will be included during automation:
- Select Specific object to connect the target object to an already known object. Enter its database name.
- Select Included object if you want to connect the target object to some object included in this automation. Then choose an included object you want to connect to from the list of all objects included in this automation before this Add Connection action.
- Click OK.
Delete Connection action
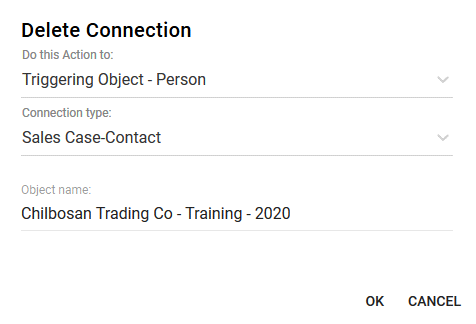
-
Select the target object of the action from the Do this action to list.
-
Select a connection type and an existing object to be disconnected.
-
Click OK.
Add Tag action
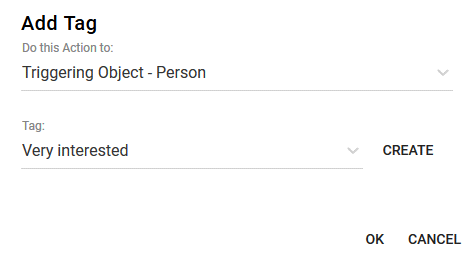
-
Select the target object of the action from the Do this action to list.
-
Select a tag from the list.
-
Click OK.
Delete Tag action
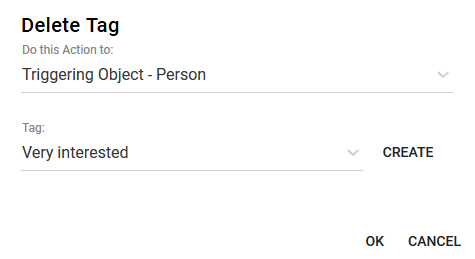
-
Select the target object of the action from the Do this action to list.
-
Select a tag to be deleted from the list.
-
Click OK.
Add Event action
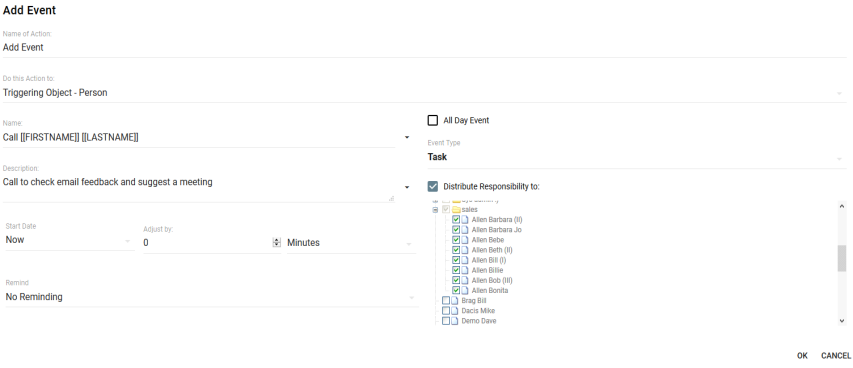
-
Enter a name for the action.
-
Select the target object of the action from the Do this action to list.
-
Set the start date. You can select from the following options:
- Select Now if you want the start date of the created event to be the time of the action.
- Select Fixed Time if you want to specify the exact start time of the event.
- Select Field if you want to use the value of the target object field as the start time of the event.
- If needed use the Adjust by setting to delay the event Start date by a needed amount of minutes, hours or days.
(Please note that the end date of the created event will be equal to its start date). - Select All Day Event if the exact start time of event is not important ( the created event will start and end at 00:00 of the day you set using the start date field)
- Select Event type.
-
Enter a name and description for the event that will be created.
In the name and description fields you can enter placeholders for fields of objects and forms available in this automation. Place the cursor where you want a placeholder to be located, click next to the edited field and select a field from the list that will appear:
 - Use the Remind field to configure reminding about the event that will be created.
- To configure people responsible for the event (connected to event as Responsible) you have the following two options:
- Select Use Selected Person as Responsible and then select an object from the list. This field is available only if the triggering object is a person or there are other included persons.
- Select Distribute Responsibility to if you want to distribute responsibility among many people in the round robin manner, so that all persons get assigned about the same amount of events. Please note, however, that if a person from the list you selected is already responsible for the triggering lead (connected as Responsible to an event which is also connected to the lead) then that person will keep its responsibility for the lead and will be assigned to this email event as well.
-
Click OK.

Add Lead Points action
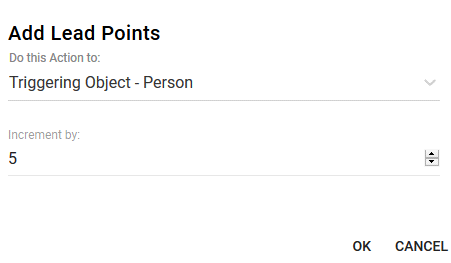
-
Select the target object of the action from the Do this action to list.
-
Enter the number of lead points which you want to add to the triggering person.
-
Click OK.
Add Person to Email List
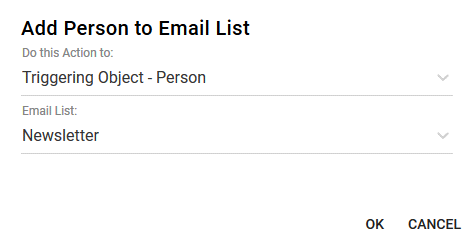
-
Select the target object of the action from the Do this action to list.
-
Select the Email list where you want to add to the triggering person.
-
Click OK.
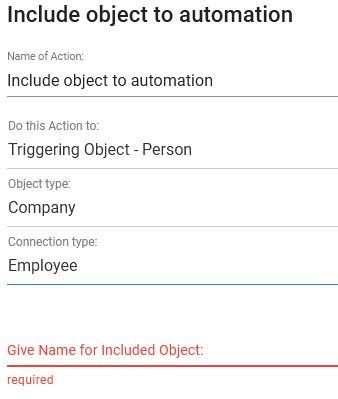
Include object to automation action
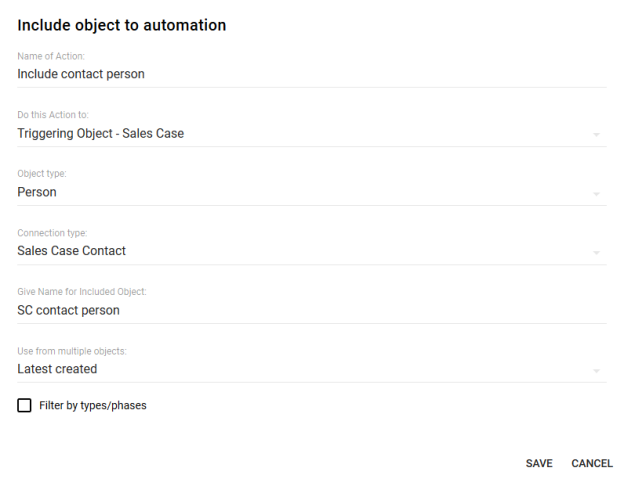
-
Enter a name for the activity.
-
Select the target object of the action from the Do this action to list.
-
First select the type of an object that you want to add to the automation.
- Next select the needed connection type with which the included object should be connected to the object selected in the Do this action to field.
- Enter a name for the included object.
- There could be several objects connected with the selected connection type so you need to use the Use from multiple objects condition to specify which one object you want to add.
- In addition, you can filter the connected objects by their type or phase fields. If selected, this filter will be applied before the Use from multiple objectscondition.
-
Click OK.
Raise Lead action
This actions adds a "Lead Raised" item to marketing statistics and it will be reflected in all charts where lead statistics is shown (for example, on the Leads page).
To configure the Raise Lead action please do the following:
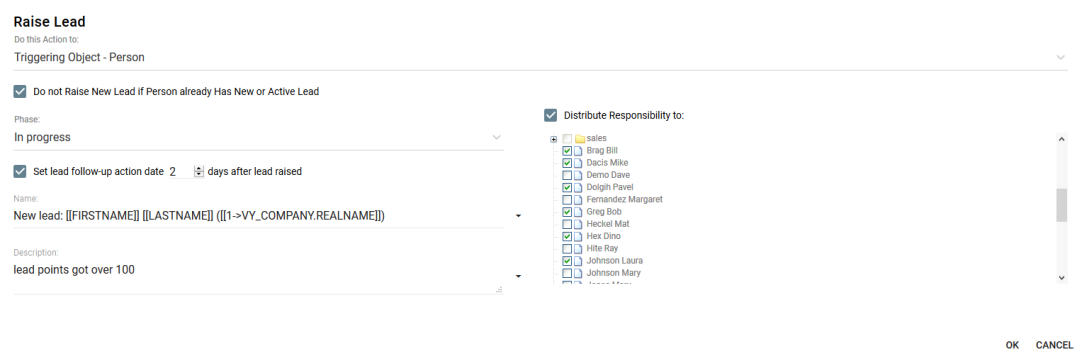
- Select the target person of the action - the lead - from the Do this action to list.
- Select Do not Raise New Lead if Person already Has New or Active Lead to prevent creating duplicate leads for persons who already have new or active leads
- Select a phase: "New" or "In Progress".
For the "In Progress" phase you can schedule a follow-up action in several days after the lead is raised. You will see the date of the follow-up action as the Next Action Date for this lead in Vine Sales. - Enter the name of the lead and its description
-
Select people you want to be assigned as Responsible for the lead:
- Select Use Selected Person as Responsible to assign a specific person as responsible.
- Select Distribute Responsibility to if you want to assign the responsibility in the round robin manner, so that all persons get assigned about the same amount of leads. Please note, however, that if a person from the list you selected is already responsible for the lead then that person will keep its responsibility for the lead and will be assigned to this lead as well.
-
Click OK.
Send Email action
When an email is sent, simultaneously an event is created in the database where the person selected in "Do this action to" is connected as an attendee.
To configure the email action please do the following:
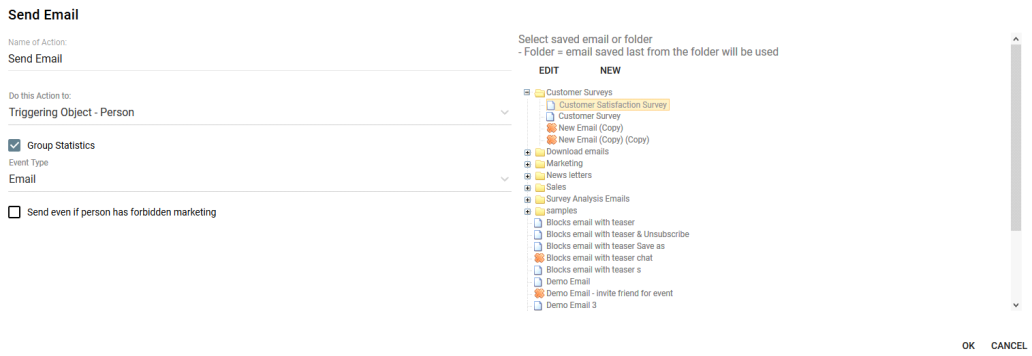
-
Enter a name for the send email action.
-
Select the target object of the action from the Do this action to list. This person will receive the email and will be connected as an attendee to the event created by this Send Email action.
- Select Group Statistics if you want to group statistics for all emails sent by this action under one event in the Mail Statistics tool.
- Select the type for the event that will be created from the Event Type list.
- Select Send even if person has forbidden marketing if you want to send email even is the person is marked as one who does not want to receive marketing emails.
-
Click New to create a new email or click an existing email to select it. You can click Edit to review the selected email and modify it if needed.
You can also select a folder of saved emails. Then the last saved email in that folder will be used. -
Click OK.
For an existing Send Email action you can click  to see the statistics for all emails sent by this action.

Send Internal Email action
When an email is sent by this action, simultaneously an event is created in the database where all recipients of the email are connected as attendees.
To configure the email action please do the following:
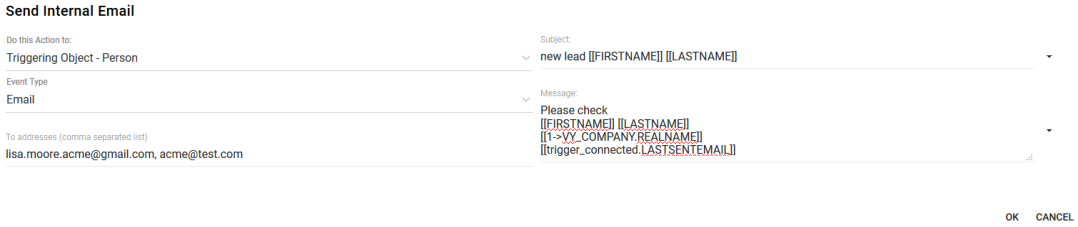
- Select the target object of the action - the lead - from the Do this action to list.
- Select the type for the event that will be created from the Event Type list. Recipients of this email will be connected as attendees to the event created by this action.
- Specify who you want an email to be sent to using the To addresses field.
"no-reply@vine.eu" is used as the From address for internal emails. -
Enter the email subject and body.
In the subject and body you can enter placeholders for object fields. Place the cursor where you want a placeholder to be located, click next to the edited field and select a field from the list that will appear.
- Click OK.
Send Text Email action
When an email is sent, simultaneously an event is created in the database where the person selected in "Do this action to" is connected as an attendee.
To configure the email action please do the following:
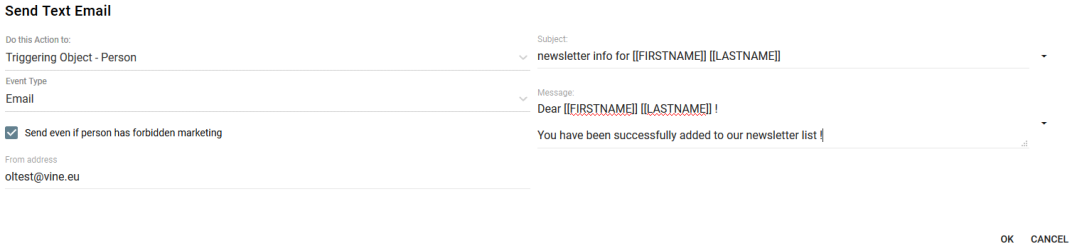
-
Select the target person of the action from the Do this action to list. This person will receive the email and will be connected as an attendee to the event created by this action.
- Select the type for the event that will be created from the Event Type list.
- Select Send even if person has forbidden marketing if you want to send email even is the person is marked as one who does not want to receive marketing emails.
-
Set the "From" address for emails sent by this action using the From address field.
-
Enter the email subject and body.
In the subject and body you can enter placeholders for object fields. Place the cursor where you want a placeholder to be located, clicknext to the edited field and select a field from the list that will appear.
- Click OK.
Send HTTP Request
To configure the Send HTTP Request action please do the following:
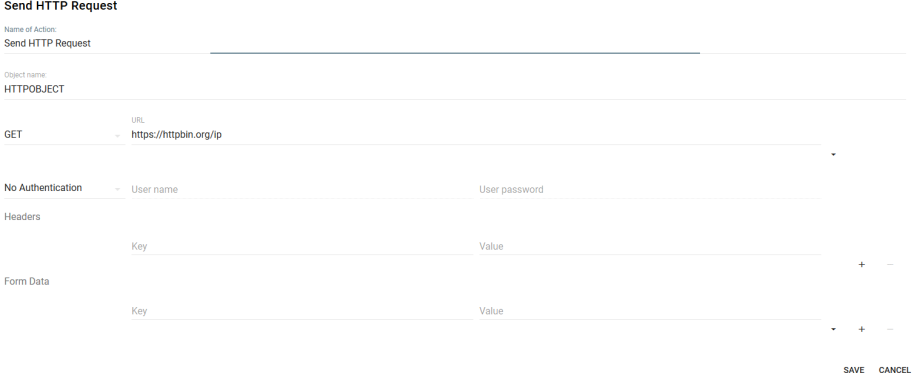
-
Enter a name for the action.
-
Enter a name of the data object where the returned data will be located.
-
Select the type of request and enter the request, its header and form fields if needed.
-
Click OK.
You can refer to the STATUS and DATA fields of the data object in the automation actions that happen after the Send HTTP Request as [[HTTPOBJECT.STATUS]] and [[HTTPOBJECT.DATA]]
Send SMS action
The Send SMS action is similar to Send email action but instead of email a short text message will be sent to phones.
To configure the Send SMS action please do the following:
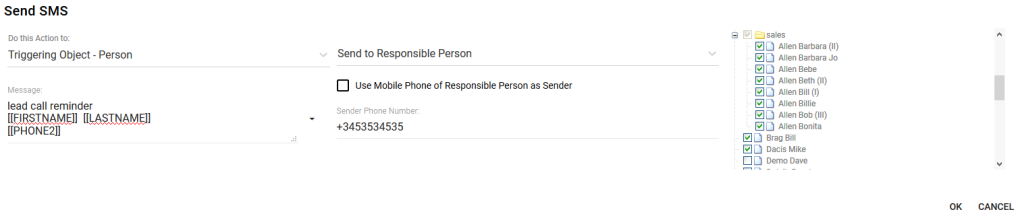
-
Enter a name for the action.
-
Select the target object of the action from the Do this action to list.
-
Specify who you want an SMS to be sent to:
-
Select Send to Lead for SMS to be only sent to the lead (person who triggered the action).
-
Select Send to Responsible Person for SMS to be only sent to the person assigned to this lead.
-
Select Send to Both for SMS to be sent to the lead and responsible person.
-
Enter the Sender Phone Number or Select Use Mobile Phone of Responsible Person as Sender.
-
Type your text message in the Message field. You can add object fields to the text using the list next to the Message field. Click
to add object fields. -
Use the Distribute Responsibility to: list to select people you want to be assigned to leads. Leads are assigned in the round robin manner in the same way as in the Send Email action.
-
Click OK.
Set Values
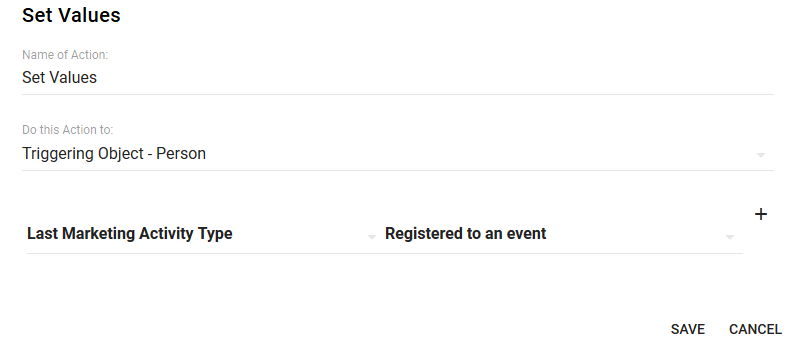
-
Enter a name for the activity.
-
Select the target object of the action from the Do this action to list.
-
Select an object's field you want to set and give it a value.
- If needed, click the plus icon again to add more fields you want to set. Or the minus icon to remove fields.
-
Click OK.
Start Another Workflow
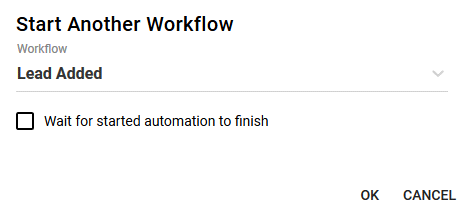
- Enter a name for the activity.
- Select the target object of the action from the Do this action to list. This will be the triggering object for the automation you will select.
- Select the existing automation you want to start from the Workflow list.
- Select Wait for started automation to finish if you want to continue the parent automation only after the started automation will finish.
- Click OK.
Wait Action
The wait action pauses the execution of the series of actions. For an existing Wait action you can click  to see if there are any automations it is currently pausing.
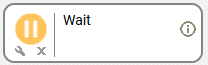
To create a new Wait action:
-
Enter a name for the action.
-
Select the target object of the action from the Do this action to list.
-
You can specify when you want the series of actions to continue:
-
The time you want to continue at from the Continue at setting.
-
The day(s) you want to continue on from the Continue on setting.
-
Select Wait till if you want an email to be sent on a specific day and time:
-
Select Take resume date from field if you want the series to continue based on the date and time saved in the triggered object’s field. If needed, you can extend the wait by using the Adjust by setting.
-
Additionally, you can set:
-
The time you want to continue at from the Continue at setting.
-
The day(s) you want to continue on from the Continue on setting
Select Wait duration if you want to pause your series for a set amount of days, hours or minutes. If you configured the pause to last for a few days then you can additionally set:
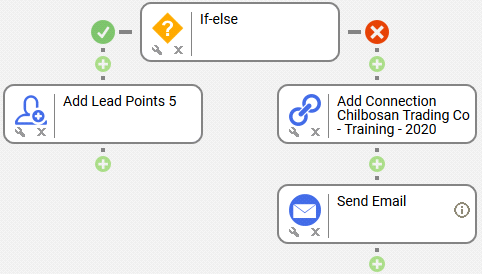
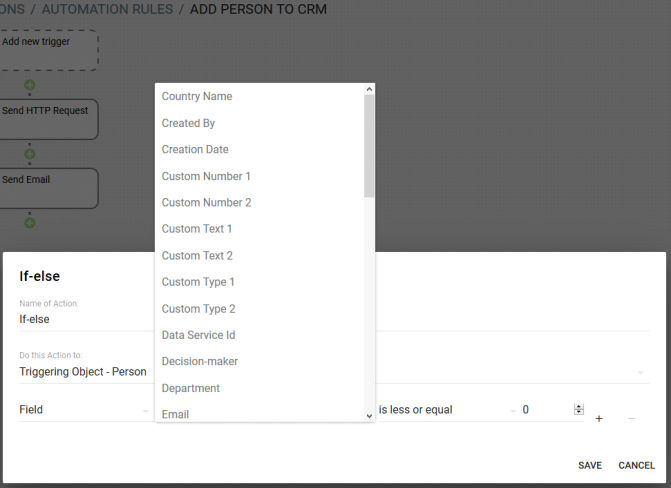
If-else action
The If-else action allows to split the workflow into the Yes/No branches based on a condition:
-
Enter a name for the action.
-
Select the target object of the action from the Do this action to list.
-
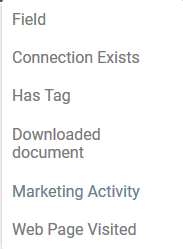
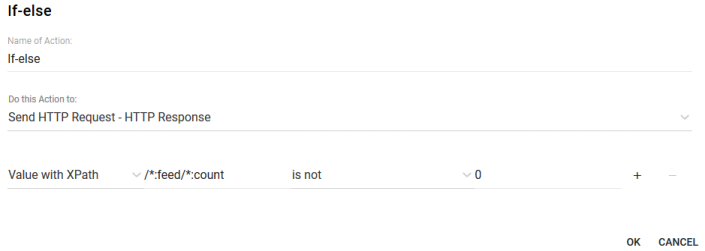
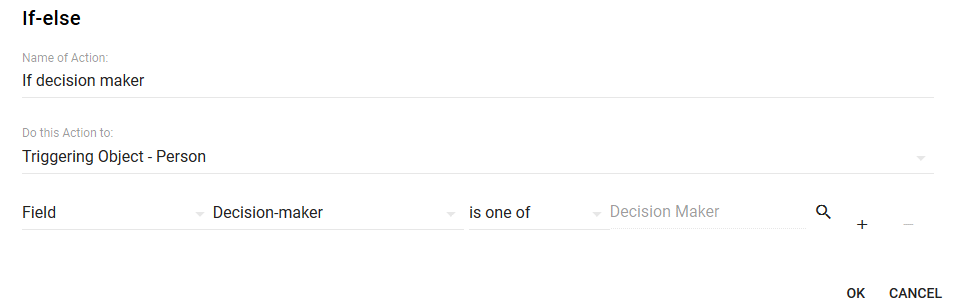
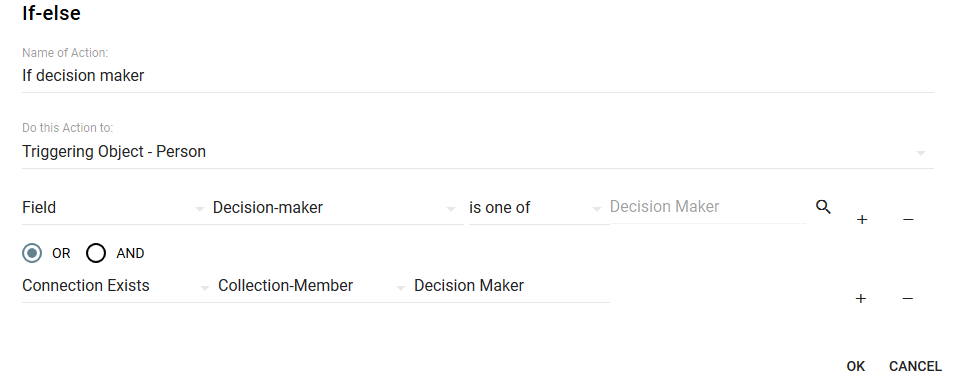
Select what you want to apply your criterion to from the first list:
Please note that the list of available options depends on the target object selected from the Do this action to list. For example , if the target object is an HTTP response then you will have the "Value with XPath" option to check the HTTP XML response:
-
Then configure your constraint using the next lists.
For example, if you have selected "Field" then select a field from the second list and then select a constraint type from the third list and click to set a constraint value in the last edit box: -
If you need more conditions click the plus sign.
-
Select the logical operation that you want to combine your conditions: OR – to make the workflow continue on Yes path if any of conditions is true, AND to make the workflow continue on Yes path if both conditions are true.
-
Select the target of your new condition.
For example, if you select Connection Exists, then select available connection types from the second list and enter the name of the object which you want the triggering object to be connected to.
-
Click OK when you do not need more conditions.
Merging Branches
To merge the IF/Else branches into a single flow:
- Add an action before which you want to merge the branches (Send Email in this example):
Click the last plus sign on the opposite branch and select Merge Branches:

In the Merge Action list select an action before which you want to merge the flow:
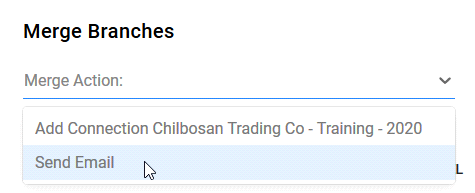
Click OK.
A Merge Branches action will be added and the automation flow will continue at the action you have just chosen:

Using Object and Web Form fields in automation
When an automation is running you can use fields of included Vine objects as well as fields of a tracking web form .
Object Fields
Object fields are fields of Vine CRM objects. For example, a person has fields such as firstname, lastname, email, phone, and so on which are available in Vine CRM as follows:
Object fields are available in all automation actions. In most actions where object fields are needed, you can select the needed fields from a list, for example:
In addition, in some automation actions, you can use the "[[]]"-notation to use object fields directly.
Form Fields
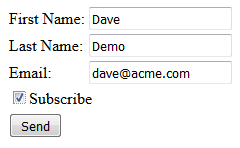
Form fields are fields of Vine tracking web forms that you can create on your web pages:
Form Fields are available in an automation if it has been started by the Form Submitted trigger (Earlier, forms could start an automation directly. You can no longer create such forms but existing ones are supported.) You can use the "[[]]"-notation to enter form fields.
Form fields are supported only in the following actions:
- Send Email
- Send SMS
- Add Event
- Send HTTP Request
Using [[]]-notation to enter object and form fields
Vine Object Fields
Vine object fields are all fields you can see in Vine object edit forms. If a Vine object has been included into automation then you can use its fields in automation actions that happen after the object has been included.
The following syntax is used in this case: [[OBJECTNAME.FIELDNAME]]. You can find the list of most important fields in the Appendix. For a full list please refer to the Vine Developer’s Guide.
Send HTTP Request object fields
When creating a Send HTTP Request automation action, you enter a name for the object that is created when action happens. The object includes the STATUS and DATA fields returned by the request which you can refer to as : [[HTTPOBJECTNAME. STATUS]] and [[HTTPOBJECTNAME.DATA]]
TRIGGER object fields
An object that started an automation can be referred to in this automation as the TRIGGER object.
You can refer to fields of this object using [[TRIGGER.FIELDNAME]] substitutions.
Web Form object fields
You can publish simple Vine Web tracking forms on your site.
In automation rules you can refer to web form object fields as follows: [[FORM.FIELD]]
- Person Firstname form field: you can refer to it in automation as PERSON_FIRSTNAME
- Person Lastname: PERSON_LASTNAME
- Country: COUNTRY
- Email or Phone field: EMAILORPHONE
- Company name: COMPANY_NAME
- Phone: PERSON_PHONE2
- Email: PERSON_EMAIL
- Title: PERSON_TITLE
- Event Description field: EVENT_DESCRIPTION
Recipient Person and Linked object fields
It is recommended to click next to the edited field and select recipient and recipient's employer company fields from the list.
However, sometimes it is useful to use direct substitutions and here is a list of substitutions you can use to refer to recipient and its employer fields:
- Recipient person fields. You can refer to fields of recipient person using [[PERSONFIELD]]
- Parameter fields of recipient person. You can refer to parameter values using [[FIELDNAME_->PARAMTABLE.NAME]].
- Fields of object connected to recipient person. For example, the employer company of recipient person. You can refer to fields of employer company of recipient person using: [[1->VY_COMPANY.COMPANYFIELD]].
Please note that in extremely rare cases when you might need to use other parameter fields except NAME you can use the following syntax [[FIELDNAME_->PARAMTABLE.PARAMFIELD]].
Please note that this syntax should be used only in cases when only one object can be connected of this type, such as Employer. In cases, when many objects can be connected with this type of connection, for example, "3"- event attendee, the result will be undefined and you should not use it.
Responsible Person Fields
You can refer to responsible person fields using the [[RESPONSIBLE.FIELDNAME]] substitutions.
For example: [[RESPONSIBLE.ID]], [[RESPONSIBLE.FIRSTNAME]], [[RESPONSIBLE.LASTNAME]]