Chatbot
Overview
About Vine Chatbot
A chatbot in Vine simulates human conversations by responding to visitor questions with best matched answers from its database of questions and answers.
You can design and configure your Vine chatbot to be shown in tracked pages on your web site. Without using any code you can:
- Configure how the bot will answer visitor questions in as many languages as you like.
- Give the bot the look you like. For example, following the style and colors of your brand.
- Make the bot appear only in web pages you want.
- Track and analyze the responses of identified visitors and use forms to ask unknown visitors to register.
Using in Sales
Chatbots are becoming more and more popular because they never get tired, work 24/7, very cost effective, and can handle practically unlimited amount of conversations at the same time. Currently, they are most popular in customer support/helpdesk, marketing, sales, etc.
In sales, a chatbot can first answer typical repetitive questions which potential customers start with and then connect the new lead to a human operator.
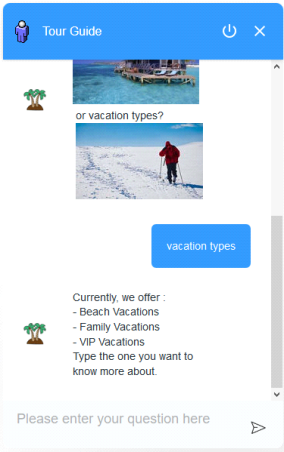
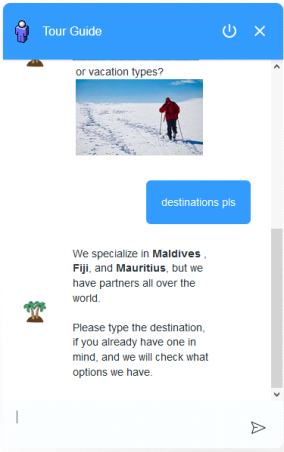
For example, a chatbot for a tour operator can start by answering questions about the available destinations, offers, and prices. Then the bot can try to clarify the visitor preferences in more detail and suggest to prepare a custom offer based on the visitor questions and answers.
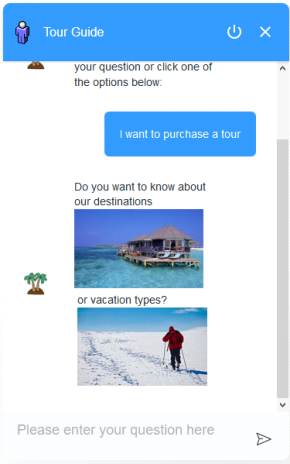
If the visitor clicks "I want to purchase a tour" then the chatbot can start narrowing down her preferences by asking if she is looking for specific destinations or types of vacation:
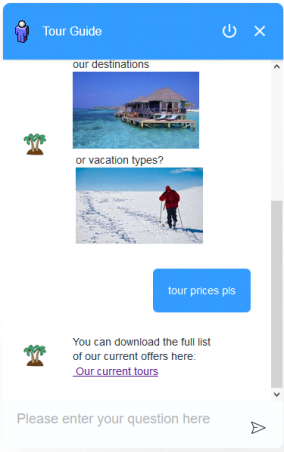
The chatbot could respond to next possible visitor questions as summarized in the following table:
| Visitor question | "vacation types" | "destinations" | "request for prices" |
| Chatbot answer |
|
|
|
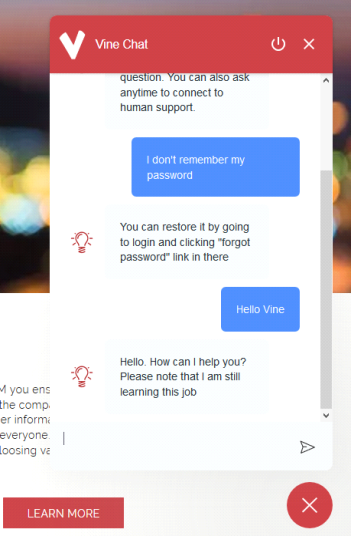
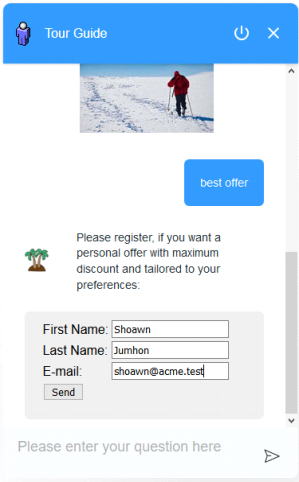
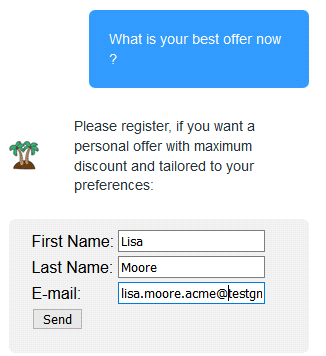
If the visitor is not a known person, then it's always a good idea to try to make the visitor register and, thus, acquire a new lead for further marketing processing:
Using in Customer Service
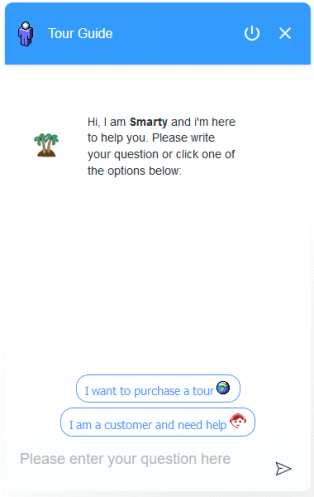
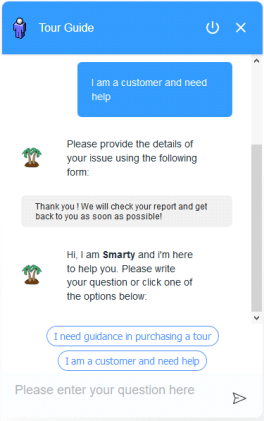
A multipurpose chatbot working on a company site should first detect if the visitor is an existing customer. For this, it can use bot greeting suggestions which direct each type of visitors to their own routes. For example, if you are a travel agency, then you can use the following chatbot suggestions to detect if the visitor wants to buy a tour or needs help:

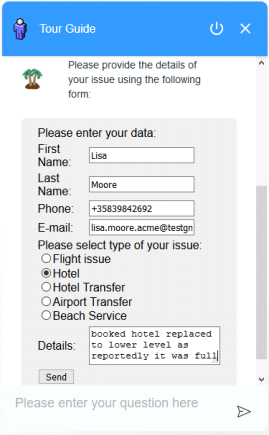
If the visitor clicks "I am a customer and need help" then the chatbot can suggest a form to gather all the key information from the person and send it by email to the support personnel:
After the visitor fills in the form and clicks Send, it might be a good idea to inform her that we have received the report and will contact her soon:
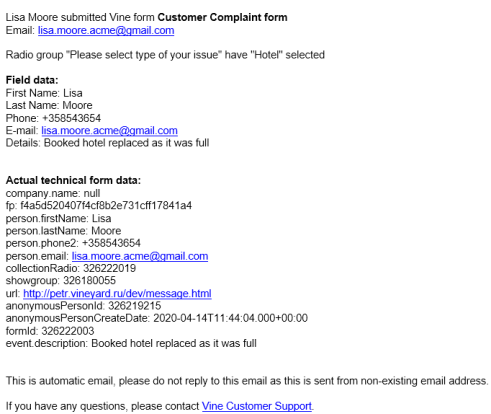
To process the customer case efficiently you can configure various actions to happen when the customer clicks the Submit/Send button:
- Send an email with the form data to an email address configured in the form. For an example, to an email address of the support team:
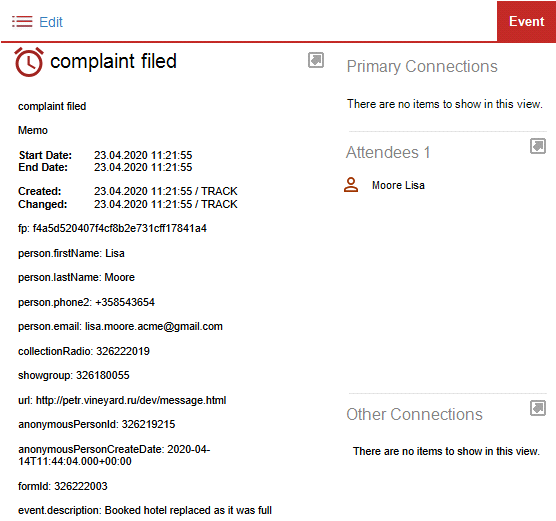
- Create an event in Vine CRM with the form data saved and the customer person connected:
- If needed, a form submit can start an automation. For example, you can use it to start your typical customer case process or to pass the data provided by the visitor to helpdesk or another system integrated with Vine MA.
Creating and Using Vine Chatbot
The Chatbot page consists of several tabbed pages. All tabbed pages show data in the language selected from the Chatbot Language list.
To edit a question and its answer, simply click the question or click  and select Edit Question
  .
.
To delete a question, click and select Delete Question .
.
Note: Before you start adding chatbot questions and answers, you need to configure the chatbot in the Settings->Chatbot.
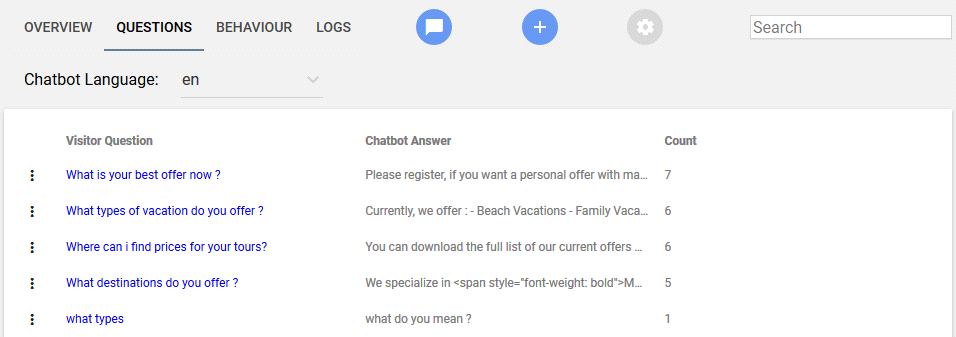
Overview Page
This page shows statistical data and lists questions which have no answers. The Count column shows a number of times a question was asked but no match was found.

Adding Missing Answers
To add an answer to a question, click the question in the Unanswered Questions pane:
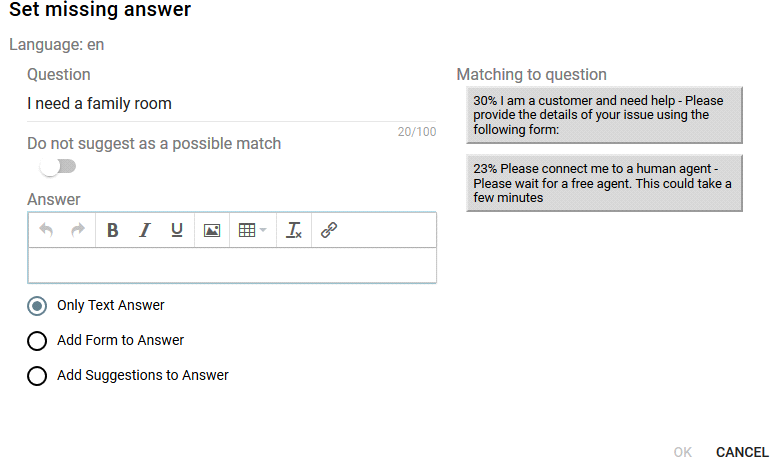
MA will match the question to all available questions, will find the best matches and will suggest answers for those best matched questions. Click any matched answer if you want it to be the answer for your question or type a new answer in the Answer field.
Now MA will check your answer against all available answers and will suggest the best matched answers.

You can click any found answer if you want to use it as the answer for your question.
Click OK to store the question-answer pair to the database.
Questions Page
This page lists questions together with linked answers.
Adding Questions
To add a question:
- Open the Questions tab, click
 and select New Question
 - Enter a question in the Question field
- Click any matched answer if you want it to be the answer for your question or type a new answer in the Answer field.
Now MA will check your answer against all available answers and will suggest the best matched answers as Matching to answer. - You can click any found answer if you want to use it as the answer for your question.
-
Select Do not suggest as a possible match if you do not want the question to be included as a clickable suggestion when the bot finds possible matches.
- Make sure that Only Text Answer is selected for a simple text answer.
- Click OK to store the question-answer pair to the database.
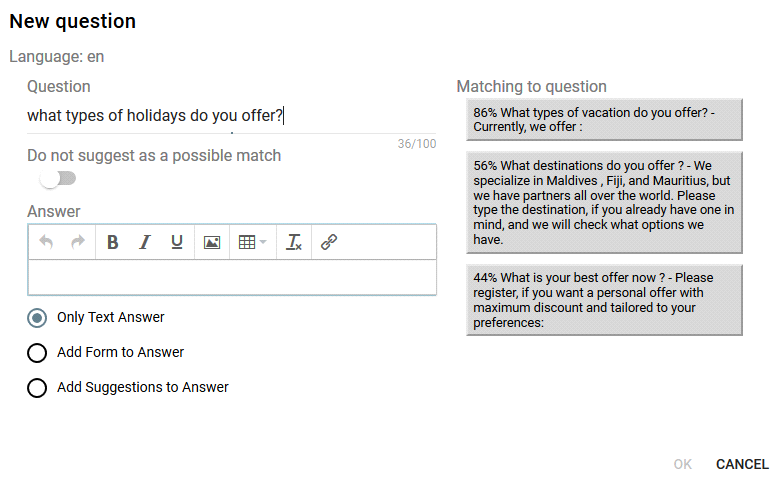
MA will match your question to all available questions, will find the best matches and will suggest answers for those best matched questions as Matching to question.
Adding a Form to Answer
You can configure your chatbot to show a web form when answering specific visitor questions:
Select Add Form to Answer if you want one of your forms to be added after the text answer:
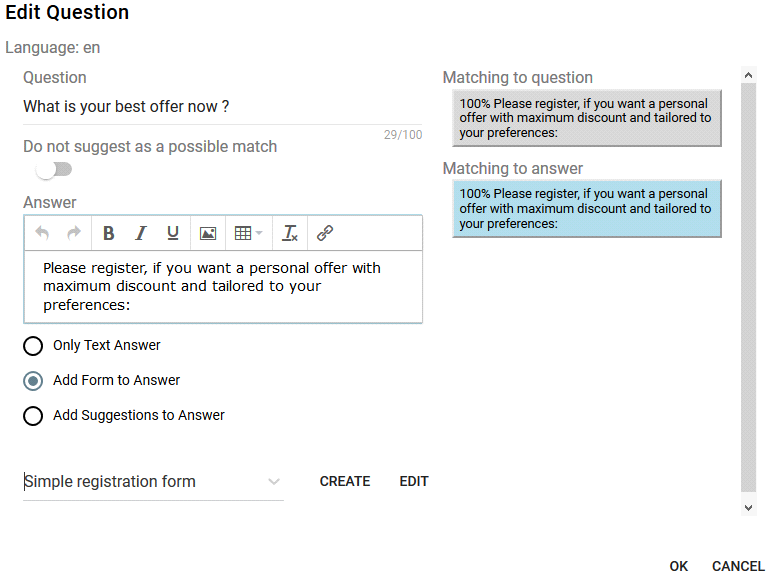
Select a web form from the list or click Create if you want a new form. You can also click Edit to change the form.
For a form used in a chatbot answer, it is recommended to use the Show Text and Redirect as Submit button actions.
Adding Suggestions to Answer
You can configure a question to be answered by a set of clickable suggestions. For example, when you want the visitor to pick one choice from many:

Select Add Suggestions to Answer if you want clickable suggestions to be added after the text answer:
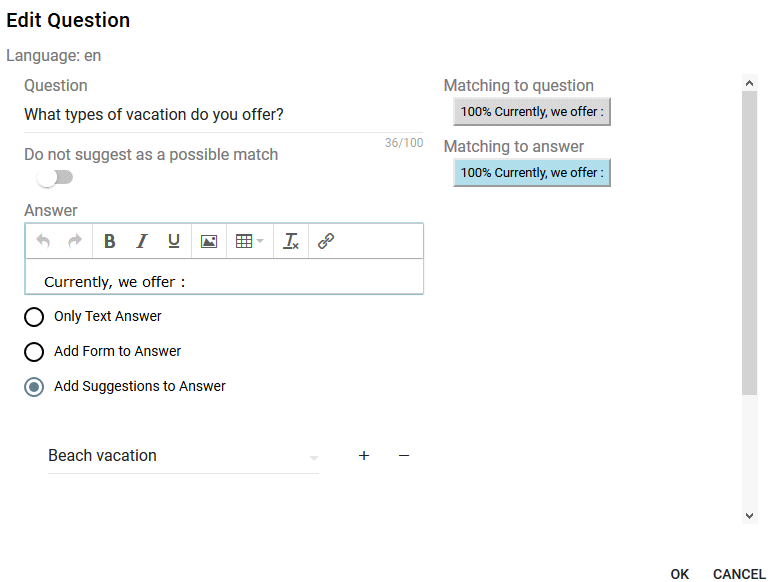
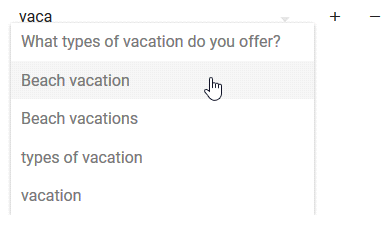
Enter a new suggested question or select one from the list of existing questions. You can start typing to show only matching suggestions in the list:
Click + to add one more suggestion or click - next to a suggestion you want to remove:
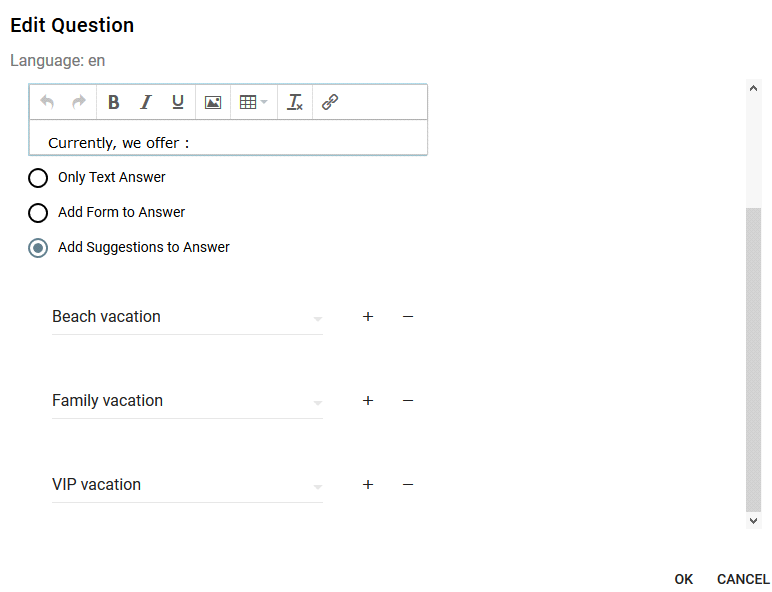
Click OK to save the question.
Removing an Answer
If you want to remove the answer from a question, then click for the question and select Clear Answer.
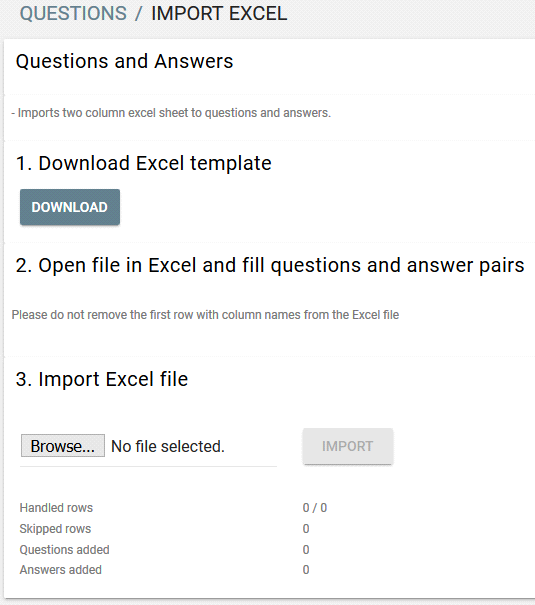
Importing Question-Answer Pairs from Excel File
- Open the Questions tab, click and select Import from Excel
- In the Import Excel page that will appear, review the needed steps and click Download.
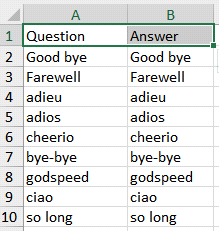
- Download and open the Excel template:
- Enable editing, if needed, or create a new Excel file with the same structure, and then add data you want to import. You should not change the first row :
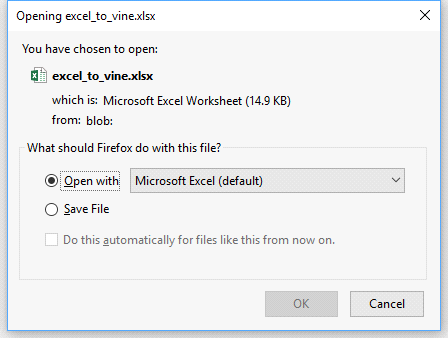
- Save the Excel file with your data and then click Browse... to find and load the Excel file you just saved.
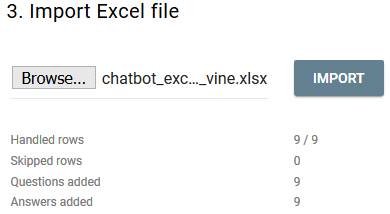
- Click Import to load questions & answers from the file to the database:
Behavior Page
The Behavior page lists chatbot rules which define when and how the chatbot dialog will open automatically. For example, you can program the chatbot to appear after the visitor spends a certain time on a page, scrolls it to a set percentage, or after it opens a number of pages on the whole site.
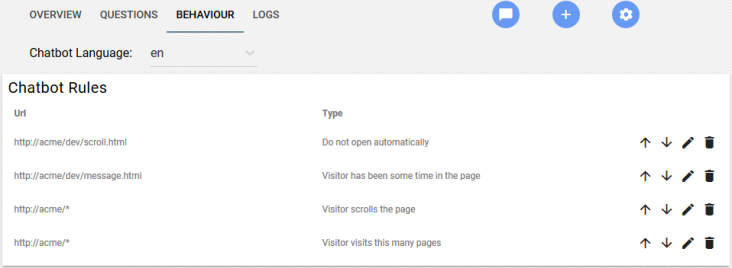
When creating a set of rules for your site, please be aware that:
- In a chatbot conversation, rules are retrieved from the top of the Chatbot Rules list to the bottom for each open page until any rule triggers. So only one rule can be triggered per conversation. Use the Up and Down arrows to change the position of a rule in the list.
- Rules are reset when a conversation is reset (for example, if the visitor closes the chatbot and restarts the browser).
Adding Rules
To add a rule:
- Open the Behavior tab and click
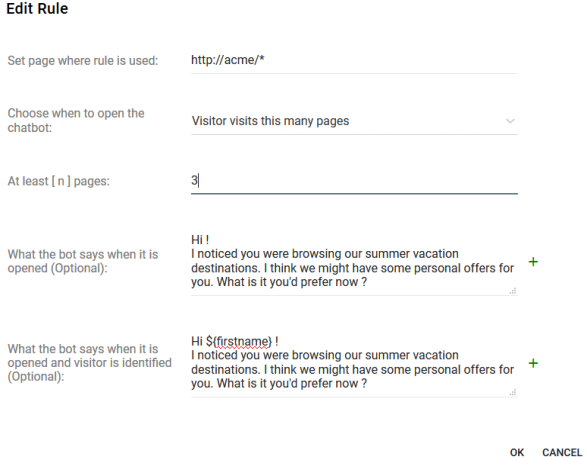
- Use the Set page where rule is used field to enter the URL of the page you want to apply the rule to or a wildcard for a set of pages:
- Select type of rule from the Choose when to open the chatbot list.
- Select Do not open automatically if you want to configure special bot greetings for the page.
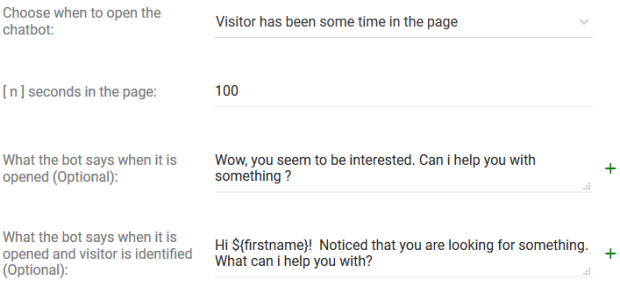
- Select Visitor has been some time on the page if you want the rule to trigger when the visitor spends on the page the given number of seconds. Use the [ n ] seconds in the page field to specify the number of seconds.
- Select Visitor scrolls the page if you want the rule to trigger when the visitor scrolls down to the set percentage of the page. Use the Scrolled [ n ] % of the page field to specify the needed percentage.
- Select Visitor visits this many pages if you want the rule to trigger when the visitor opens pages from the given set the given amount of times. Use the At least [ n ] pages field to specify the required count of opens. (Please note that the rule counts every page opening. Thus, reloading the same page counts as a page open too.)
- Use the What the bot says fields to set different bot greetings for unknown and identified visitors. You can use the ${firstname} tag to be replaced with the name of the identified person.
- Click
 to the right of the greeting fields to add chatbot suggested questions.
 - Click OK to save the rule to the database.
(Please note that when this rule matches a real page, this does not stop retrieving next rules.)

(This rule triggers for a page matching the condition in Set page where rule is used. Retrieving next rules stops, but the chatbot will open only when the visitor spends the given time on the page.)

(This rule triggers for a page matching the condition in Set page where rule is used. Retrieving next rules stops, but the chatbot will open only when the visitor scrolls the page by the given percentage.)

(This rule triggers for a page simultaneously matching the conditions in Set page where rule is used and At least [ n ] pages. Retrieving next rules stops.)
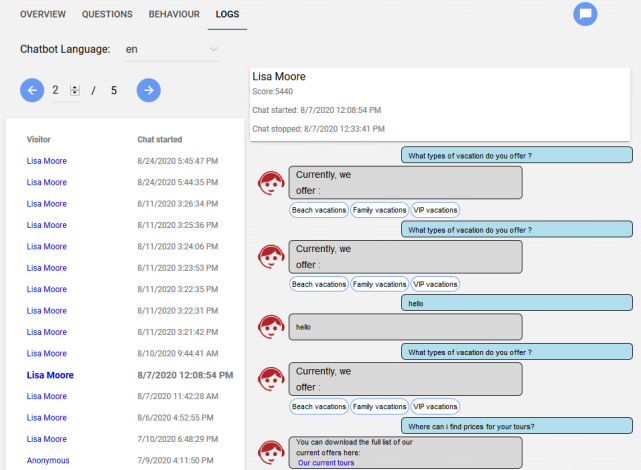
Logs Page
The Logs page lists details of each chatbot conversation.
Using Preview
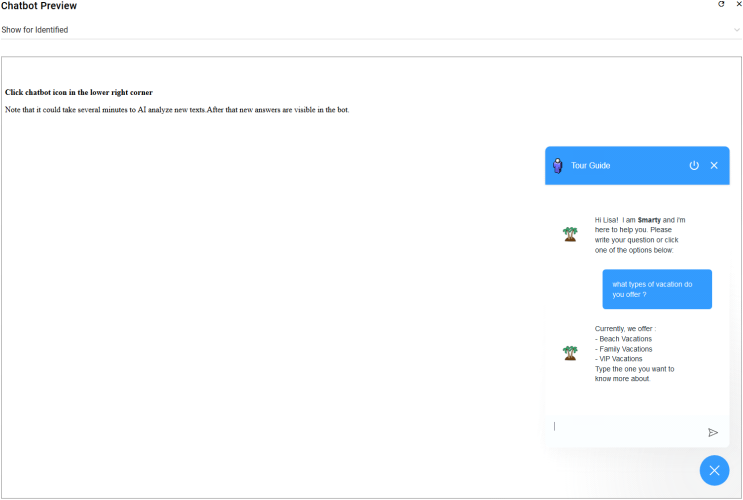
Click Chatbot Preview icon  to view and test you chatbot in action. If the chatbot is not open then click
  in the bottom right corner to open it.
Please note that fresh changes in chatbot might need some time to be reflected in the preview.
The chatbot controls work as follows :
Select Show for Identified to see how the chatbot looks and behaves for identified persons or select Show for Anonymous to verfy the chatbot for unknown persons.
The big cross at the bottom  and the small one at the top right corner minimize the chatbot dialog.
The switch icon  resets the chatbot and shows the chatbot greeting.
You can click  in the top right corner to refresh the preview page and the small cross
  to close Preview.