Tools and Settings
Tools Organizer
Please see the following separate section about the tool: Tools Organizer
Plug-ins Editor
Please see the following separate section about the tool: Plug-ins Editor
Edit Parameter Values
Using this tool, you can create, edit or remove values of Vine parameters. Each parameter defines a set of values, which can be assigned to parameter fields of Vine objects.
For information about parameters please refer to the Parameters section of the Main Concepts chapter of this guide.
Add a New Value of Parameter
Select the parameter you want to change from the Type list:

Note: The text to the right of the table of parameter values reminds you of the object types where this parameter is used. A single parameter can be used for various objects.
If the New button is disabled, you cannot add new values for this parameter.
Click New... to add a new value, i.e. a new row to the parameter table:
- Enter an ID of the value. By default, the dialog suggest an ID number that is larger at least by 10 than the previous largest ID. This ensures that you will have room for later additions.
- If it is a phase parameter, then select In To-Do list if you want objects in this phase to be shown in the To-Do list.
- Enter a name for the value. Note that users will see and operate with this text name. IDs are used by Vine products internally and are not shown to users.
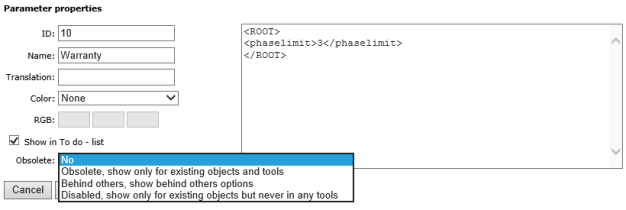
- If needed enter the translation for the language selected at the top of the tool.
- Select the color you want to highlight objects when they have this parameter value. If you want a custom color you should select Custom color from the Color list and set its RGB values.
- Set the value of the Obsolete field.
- If needed you can enter a value in the XML data field. This is only needed for custom plug-in extensions. Please note that the ROOT element must be in the upper case.
- Click Save.
Edit a Value of Parameter
Click Edit next to the parameter value you want to edit. Note that you cannot change the value's ID:
Remove a Value of Parameter
When removing a parameter's value, you have to select another value of the same parameter that will substitute the removed value.
- Click Remove next to the value you want to remove. You will see a dialog listing all other values of this parameter.
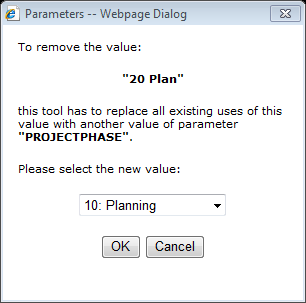
- Select the new value you want the old value to be replaced with and click OK.
- You will be reminded that you cannot undo this operation. Click OK. All the occurrences of that old value in the database will be replaced with the new value and the old value will be erased from the parameter.
Changing Positions
By default, lists of parameter values are ordered in Vine clients by their IDs. If you want to change positions of some parameters click Change positions. You will see a dialog where you can drag a parameter value to any position you like:
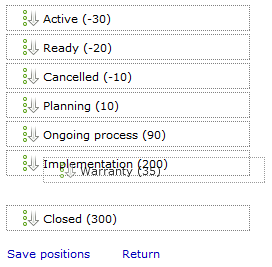
Click Save positions to change the order of parameter values.
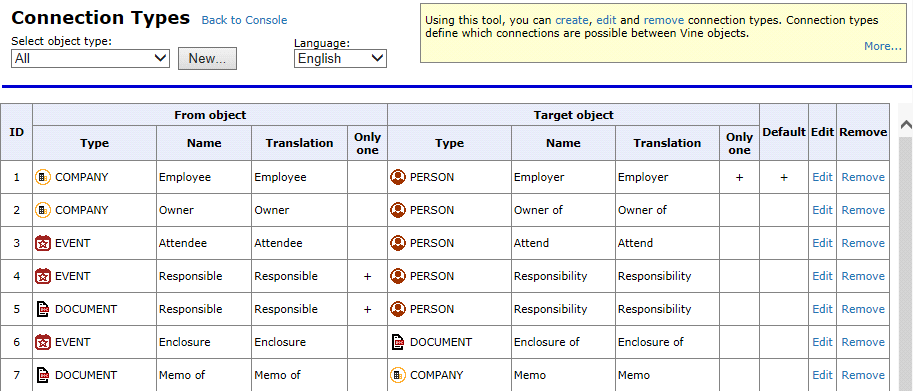
Edit Connection Types
Using this tool, you can create, edit or remove connection types. Connection types define which connections are possible between Vine objects.
For information about connection types please refer to the Connection Types section of the Administration|tag=AdministrationLT chapter of this guide.
Filter Visible Connection Types
By default, all available connection types are shown. You can filter out those you do not need now, by selecting an object type from the "Select object type" list. Only connection types that have the selected object type as the FROM or TARGET type will be shown.
Create a New Connection Type
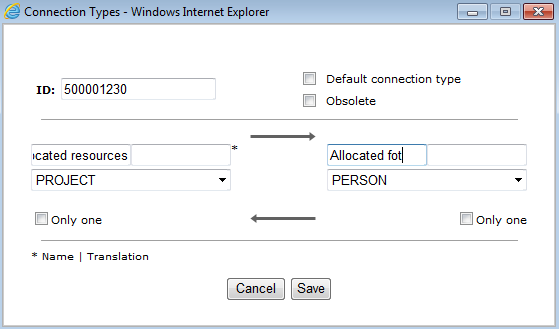
Click New... to create a new connection type.
- Enter an ID of the connection type. Each connection type has a unique identification (ID) number. The suggested default ID is the largest existing ID plus at least 10. It is not recommended to number IDs consecutively. By skipping numbers and leaving room for additions, you will later be able to insert a connection type in between the existing ones.
- Choose appropriate object types from the object lists. Note a couple of limitations due to the database integrity reasons:
- You cannot create connection types where Event is the "Target" object type.
- You cannot create connection types where Collection is the "From" object type.
- Enter connection type names for both directions:
- If needed enter the translations for the language selected at the top of the tool.
- You can restrict the number of possible connections in either direction. Select the Only One check box for the needed direction.
- If you want this connection type to be the default one for this pair of object types, select the Default connection type check box. The default connection type is automatically selected when the user sees the Choose Connection type dialog when connecting a pair of objects. Note that the dialog is not shown if there is only one possible connection type between the pair of objects.
Edit a Connection Type
Click Edit next to the connection type you want to edit. Note that only can edit end names of connection types with IDs below 1000 and you cannot edit connection type IDs of any existing connection type.
Remove a Connection Type
Removing connection types should be carefully planned. It is strongly recommended to not remove connection types with IDs less than 1000 because those form the core of the Vine system. However, you can remove a connection type with ID greater than or equal to 1000, in case the type is unnecessary and it has a matching connection type with the same FROM-TARGET combination.
- Click Remove next to the connection type you want to remove. If there are connection types matching the removed one by the FROM-TARGET object types, you will see a dialog listing all suitable connection types.
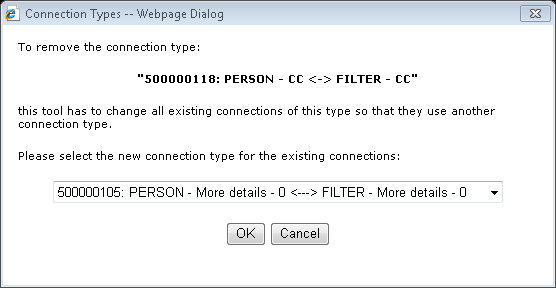
- Select the type you want your connection to be replaced with and click OK.
- You will be reminded that you cannot undo this operation. Click OK. All the existing connections of that type will be replaced with the new type and the unnecessary type will be erased from the database.
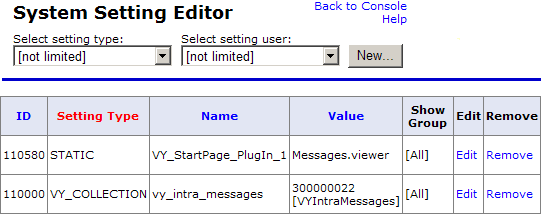
System Setting Editor
Use the System Setting Editor wizard in the Administrator’s Console to set, change or remove Vine system settings:
For information about system Settings please refer to the System Settings section of the Main Concepts chapter of this guide.
By default, the existing settings are displayed in a table view. A user may apply filters to the view in order to limit the number of settings displayed. For instance, it is possible to view only those settings that pertain to a specific object type or person.
The Edit and Remove links are accessible from the main table view. To Edit a setting, modify the appropriate fields in the displayed combo boxes and edit fields.
Adding new settings
- Click New to add a new setting.
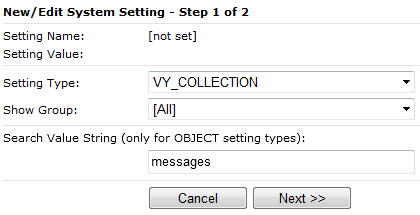
Select setting type and showgroup on the first page of the wizard. If you want to find or filter available values on the next page you can enter a partial value name in the Search Value String field:
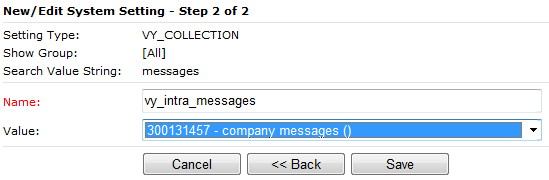
- Click Next to go to the second and last page of the wizard. Here enter the name of the setting and select its value from the filtered Value list. For a static type of system setting you need to enter a value.
- Click Save to save the system setting to the database.
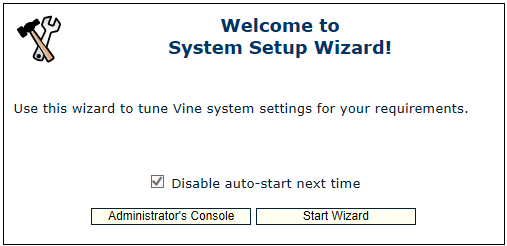
System Setup Wizard
Use this wizard to tune Vine system settings for your requirements.
The System Setup wizard helps the Vine administrator to configure all the standard Vine system settings. Vine Web prompts to run this wizard when the Administrator’s Console is started for the first time:
Please note that when you click Start Wizard, some initialization of database collections will happen which is required for proper work of many tools on an empty database:
- Initialization includes several collection sets. Each set includes a system setting which specifies the top parent collection and a list of child collections (or system settings defining child collection). If needed, you can check the exact content of the initialization in the AC_generate.xml file located in WEB-INF folder of Vine Web folder.
- Initialization of each collection set happens only if the corresponding system setting does not exist. If it exists then the set is skipped.
- Editing the AC_generate.xml file is highly not recommended as it defines the correct work of many tools and Vine Web installer will overwrite the file in next upgrade.
- Not all wizard steps are available in the ASP (myvine) mode.
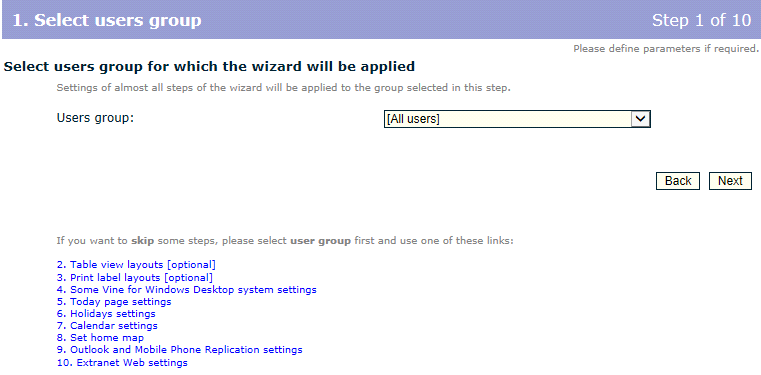
1. Selecting User Group
If needed select the user group you want to be set as showgroup for settings configured with the wizard. Please note that if you need to create different settings for different user groups then you need to run the wizard for each user group.
Click Next or click the direct step link if you want to skip some settings:
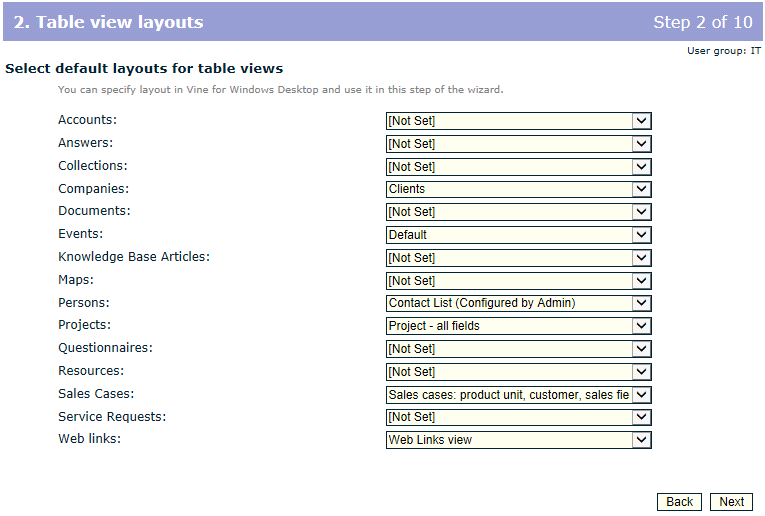
2. Setting Default Layouts for Table Views
Select default table view layout for each type of objects. Users can override this setting and set their own default views.
Table view layouts can be created in Vine client for Windows.
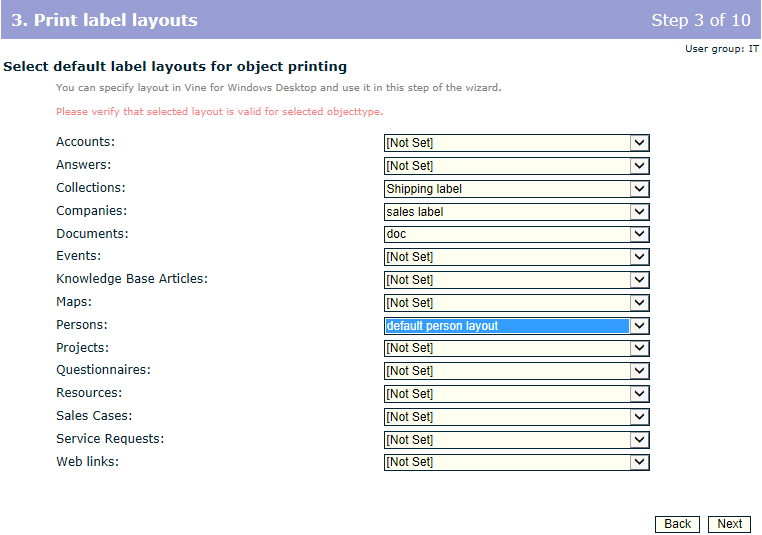
3. Setting Default Label Layouts for Object Printing
Set default print label layouts for object types.
Print label layouts can be created in Vine client for Windows.
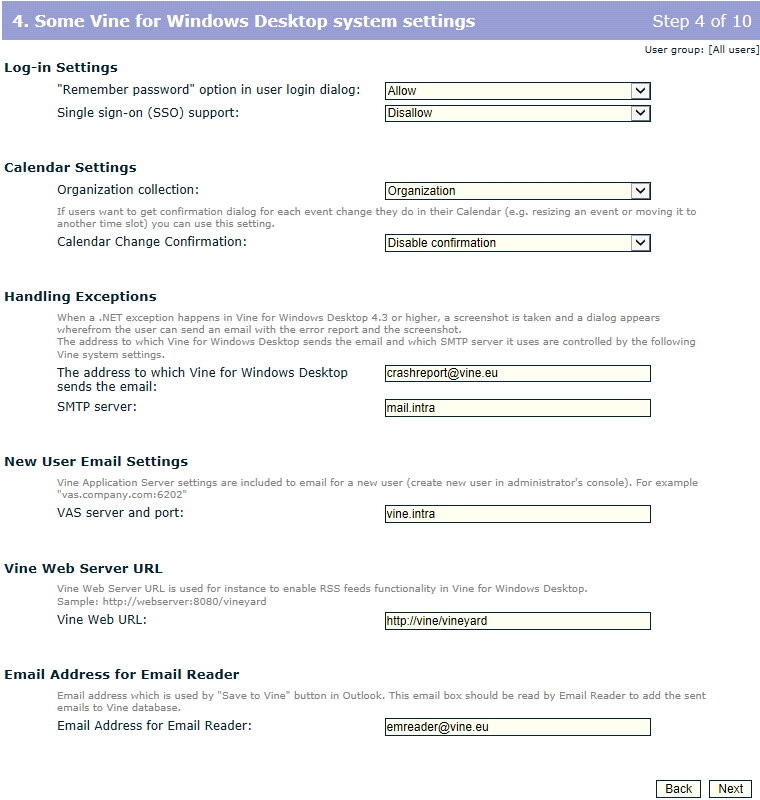
4. Vine Client for Windows System Settings
Configure various Vine system settings. For more info about these settings please refer to the Some Vine System Settings section of the Vine Client Products chapter.
5. Today Page Settings
Configure the Latest News on Today page system setting. For more info about this setting please refer to the Some Vine for Windows System Settings section of the Vine Client for Windows chapter.
6. Holiday Settings
At this step you can set the HolidaysInClient setting for the chosen user group. For more info about this setting please refer to the Setting Holidays section of the Advanced Administrative Tasks chapter.
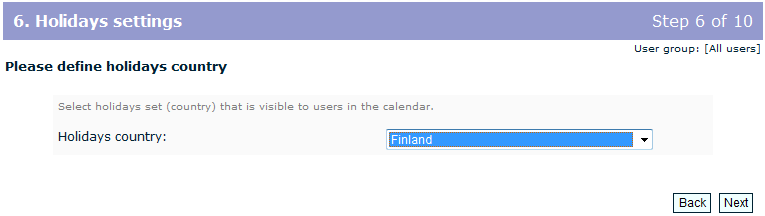
This sets the showincalendar field of event types (entries in vy_eventtype). That is why it is applied globally in Vine and not only to some user groups.
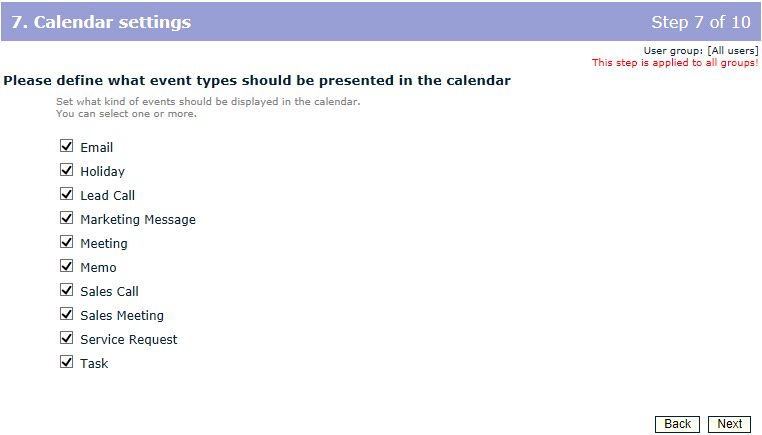
7. Calendar Settings
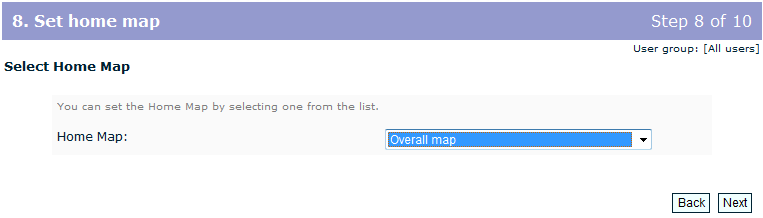
8. Setting Home Map
This does the same as the Set Home Map tool in the console, that is, sets the home map.
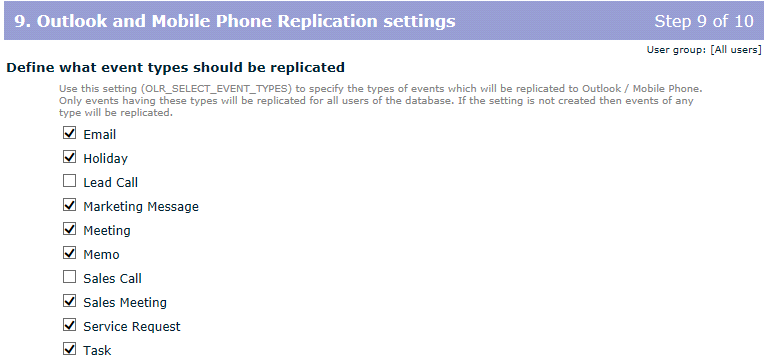
9. Outlook and Mobile Phone Replication Settings
Please define which event types you want to be replicated and how you want Outlook Contact data to be replicated into Vine persons and companies. For more information, please refer to the Vine Outlook Replication section in the Vine Client Products chapter.

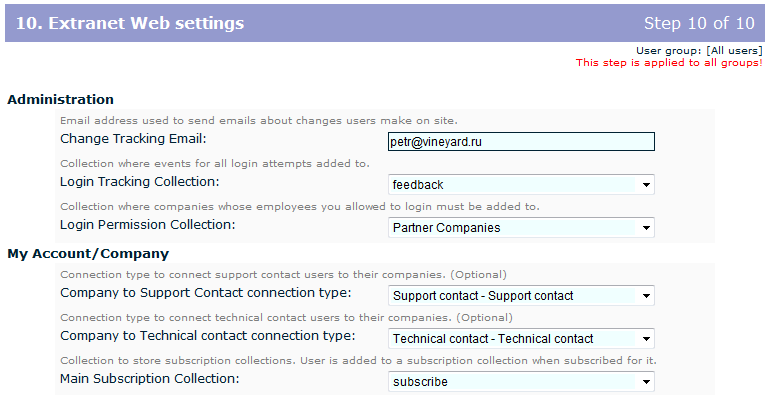
10. Vine Extranet & Mail Wizard Settings
You can configure Vine Extranet on the step 10 of The System Setup wizard:
Customizing Mail Wizard Settings

The settings are well explained in the wizard so here are only some additional comments about some settings:
- Mail Server. The wizard stores emails to the Vine database where an oracle job takes them from when needed and sends them using this email server. Usually, it’s the same mail server you normally use for e-mails in your company.
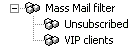
- No Mail Collection (Mail Filter). This setting defines a parent collection which will include child collections whose members must not receive mass e-mails. The wizard will scan all the people included in the child collections of this parent collection and exclude them from the list of mail recipients. For example, if you have set the "Mass Mail filter" collection as a mail filter then the wizard will exclude members of the "Unsubscribed" and "VIP clients" collections from mail recipients:
The use of this setting will help you avoid sending e-mails to people who do not want to receive them and thus prevent their possible annoyance at getting unsolicited messages.
- Invalid Mail Address Collection. This setting names a special collection in which the wizard will copy all person objects whose e-mail addresses are invalid. The users can check that collection and correct the addresses.

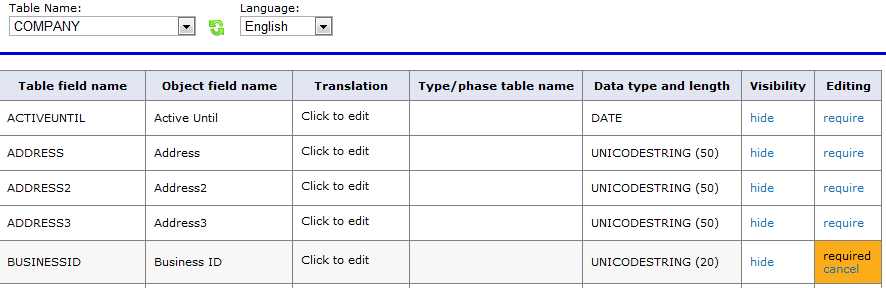
Object Field Editor

Please note that:
Changes which you do with this tool will apply to all objects of the selected type you have in the database.
In the ASP mode (myvine), the changes the organization administrator does are applied to the organization of this administrator only.
Renaming Fields
You can rename any object field so that the users see a different name in their language.
To rename a field:
- Select the needed table from the Table Name list.
- Select the needed language from the Language list.
- Click in the Translation column for the field row you want to rename and type your new name.

Hiding Fields
You can hide object fields your users do not need. If you hide a field it will no longer appear for the users of your company (this is not supported in object edit forms):
To hide a field:
- Select the needed table from the Table Name list.
- Click Hide in the Visibility column for the field you want to make unavailable for your users.

Making Fields Mandatory
You can make an object field mandatory to fill in edit form:
To make a field mandatory:
- Select the needed table from the Table Name list.
- Click Require in the Editing column for the field you want to make mandatory in edit form to fill in.